Basic Macro Photography.


Overview:
This site will introduce you to basic macro photography. Most of the images on this site were taken with a Canon PowerShot S3. When accessory lenses are needed, I typically use either a Raynox DCR-250 or a Raynox MSN-202 close-up lens. I'll try to cover various lighting techniques. Some of the images you'll see have obvious mistakes. I'll offer suggestions to keep you from making the same mistakes. Since this site is going to cover mainly basic macro-photography on a budget, I'll try to show you how to get the most of the on-board flash. This means that you'll see lots of different home-made flash diffusers.

A few quick notes:

  • If you have questions about the operation of the lenses and/or cameras mentioned on this site, feel free to email me.  
  • If you want to comment on the content that I currently have (all constructive comments welcomed), please email me.  
  • I've used relatively large images on this site. If you're using a screen resolution of less than 1024x768, it will be very frustrating to use this site. With the large, high resolution monitors becoming more available and more affordable, this site would quickly be unusable if I designed it for use at low resolution. Also, I know how frustrating it is to have tiny images on photographic sites. If you are unable to increase the screen resolution on your computer and are really interested in the information on this site, download the Opera browser and set the display size (zoom) to 70%.  
  • Much of the information here may seem obvious to those who are experienced photographers. This site is designed to help those who are just getting started. It will show them the equipment and the photographic results (both good and bad) from using various techniques.  
  • The images of some of the spiders and such (must click links to see) may be disturbing for young children. The images are typically very detailed.  
  • When learning this type of photography, you will take bad photos. You may have to take 10, 20 maybe more to learn to photograph certain types of objects. Don't give up. Too many people give up if they can't get it right the first or second try. That type of attitude will prevent them from doing great things. With digital cameras, there is essentially no cost for bad photos. In time, you will get better.  
  • If you're using a screen resolution of 1024x768, you may want to use the F11 function to go to full screen mode. Hit the F11 button again to return to normal mode.


Monitor Calibration

If your monitor is properly calibrated, you should be able to see a slight difference between adjacent blocks below. In the second row, you should be able to read "Basic Macro Photography" in each block. If you have a good quality, properly calibrated monitor, you should be able to read it in the third row also. You can use the controls on your monitor as well the software supplied with your video card to make the adjustments. When making the adjustments, try to get the left-most block absolutely black (not dark gray) and try to get the right-most block absolutely white (as bright as it can be). Before you make any adjustments, I strongly recommend that you make notes of the current settings. For those who are not computer savvy, it may be difficult to get back to your current configuration if you don't know what they were.


Basic Macro Photography Basic Macro Photography

When adjusting your monitor, view the image from your most natural viewing position. If you move your head up or down, you'll see that the contrast changes significantly. If you don't view it from the same position while making the adjustments, the calibration won't be correct.


Main Menu
  1. Basic Equipment
  2. Choosing the Best Setup
  3. Flash Diffusers
  4. Depth of Field
  5. Monopod/Distance Gauge
  6. Color Cast from Surroundings
  7. Extended Exposure
  8. Light Sources
  9. Influence of Ambient Lighting
  10. White Balance Failure
  11. Proper Exposure
  12. Compressed Gas Dusters
  13. Further Softening the Flash
  14. Close-Up Lens Comparison
  15. Diffuser Comparison Shots
  16. Other Styrofoam Diffusers
  17. Shooting Flowers
  18. Photographing Clear Bottles
  19. NEW - Photographing Wine Bottles
  20. Photographing Coins
  21. Basic Jewelry Photography
  22. Miniature Clamshell Stage
  23. Dark Images
  24. Inexpensive Light Table Flash Units
  25. Inexpensive Light Table Using CFLs
  26. Shooting on a Glass Stage
  27. Building a Mini-Studio
  28. Photographing Electronic Equipment
  29. Random Notes
  30. NEW - Photographing Live Insects
  31. Sample Images (mostly images of insects)


Basic Equipment:
In this tutorial, you will see equipment that can be purchased on a relatively small budget. If you have a budget that will allow you to purchase top_of_the_line macro equipment with specialized flash devices, very little of this will apply. Of course, you're welcome to visit but this is intended for beginners and those with a tight budget.

Generally, the camera is the most expensive piece of equipment. It's important to get a camera with a relatively good lens, a good zoom factor (an optical zoom of 10-12x is generally good enough) and some way to attach accessory lenses to the camera. Most digital cameras with a zoom lens don't allow you to attach close-up lenses directly to the lens so you must attach an adapter to the body of the camera. Not all cameras can accept lens adapters so if you intend to use the camera for macro-photography or you want the ability to use filters with your camera, make sure that a lens adapter is available for the camera you're using. On this camera, I use a LensMate adapter to attach the various close-up lenses (browse the lens comparison images while on their site). They connect to the camera with a bayonet type connector and the other end has either 52mm or 58mm threads for accessories. Even if you don't need accessory lenses, this adapter will protect the fragile zoom lens assembly.
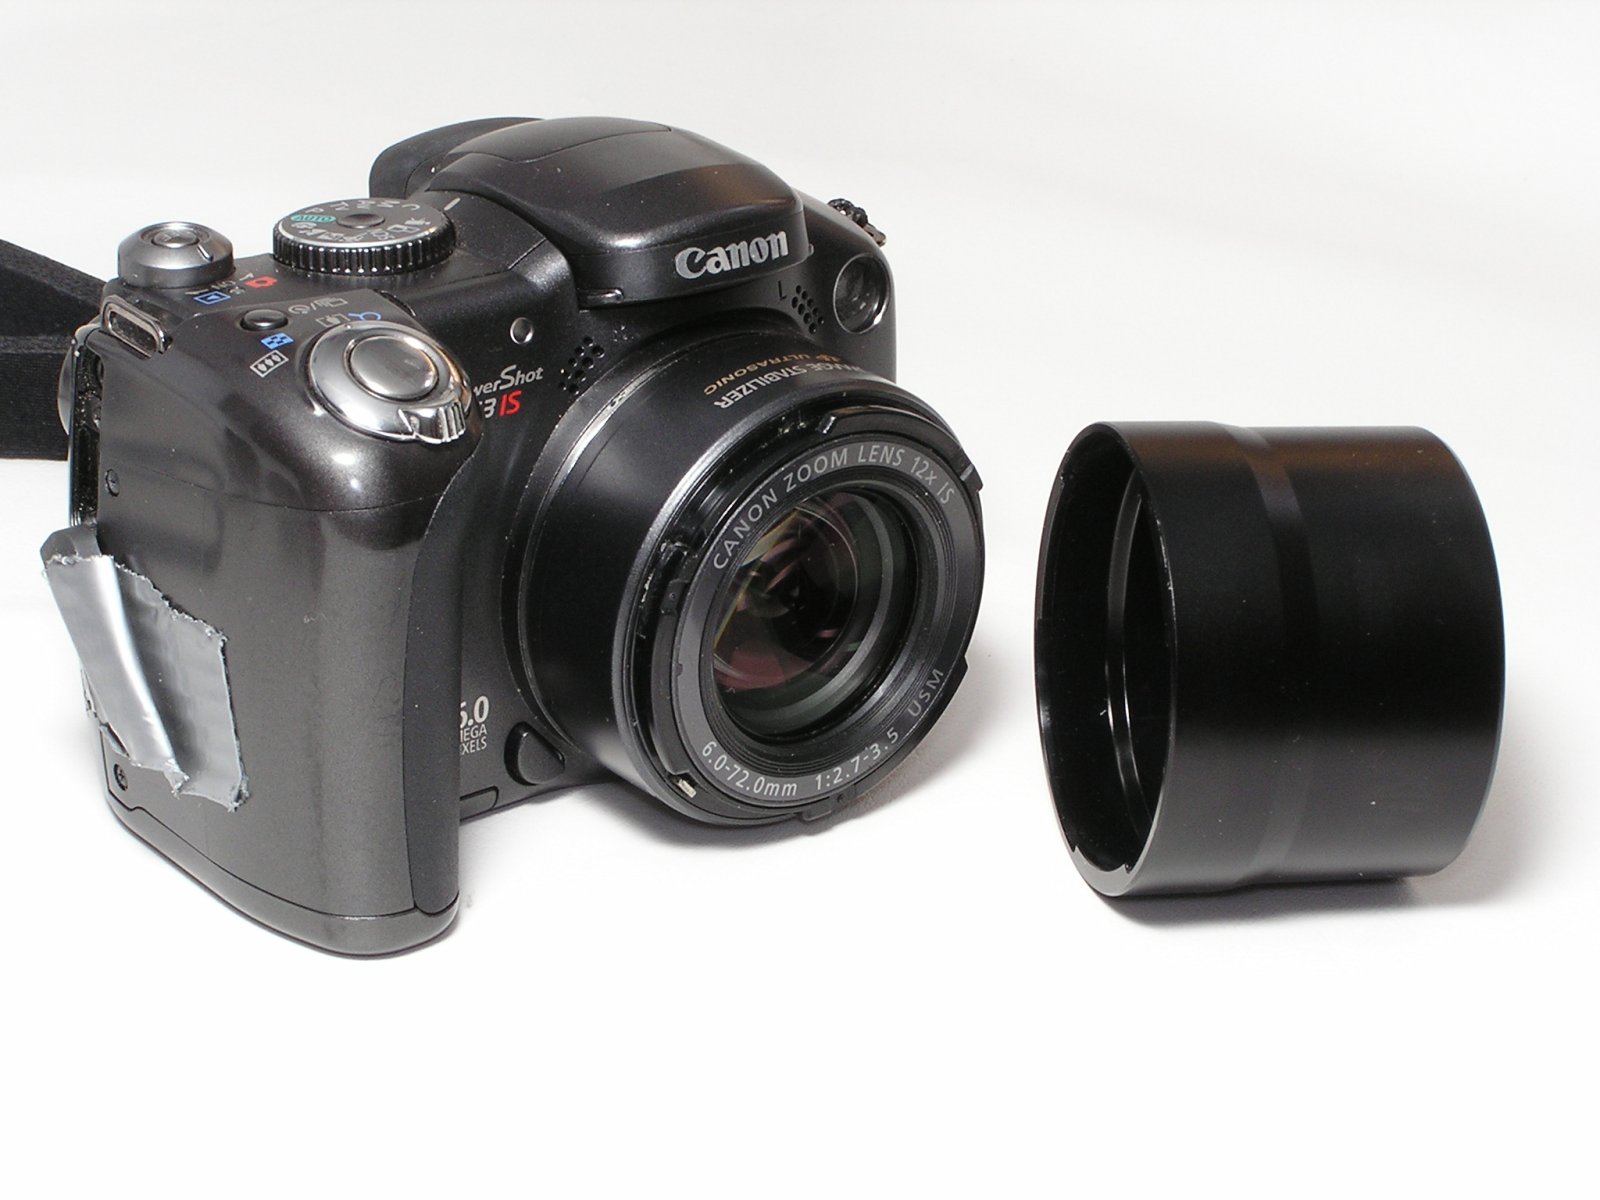
Canon S3 IS and LensMate 52mm Adapter

A note about super zoom cameras... Super zoom cameras (generally those with 10x or higher zoom) are not known for super high quality images. As with anything, when you push technology to the limit, something is going to suffer. There are always tradeoffs. For the non-pro photographer, the newer super zoom cameras produce sufficiently high quality images for all but the most demanding situations. For macro photography, the zoom helps you make small objects larger. The close-up lenses allow you to focus closer, but without significant zoom, the image of small objects may not be large enough to be useful.

In the adapters below, you should note that the interior of the barrel is black. If you buy an adapter with a silver interior, you need to paint it black (flat black). I purchased a cheap silver adapter for my other camera and all of the images that were taken in bright light with the adapter in place were washed out. After painting the interior black, the results were much better.
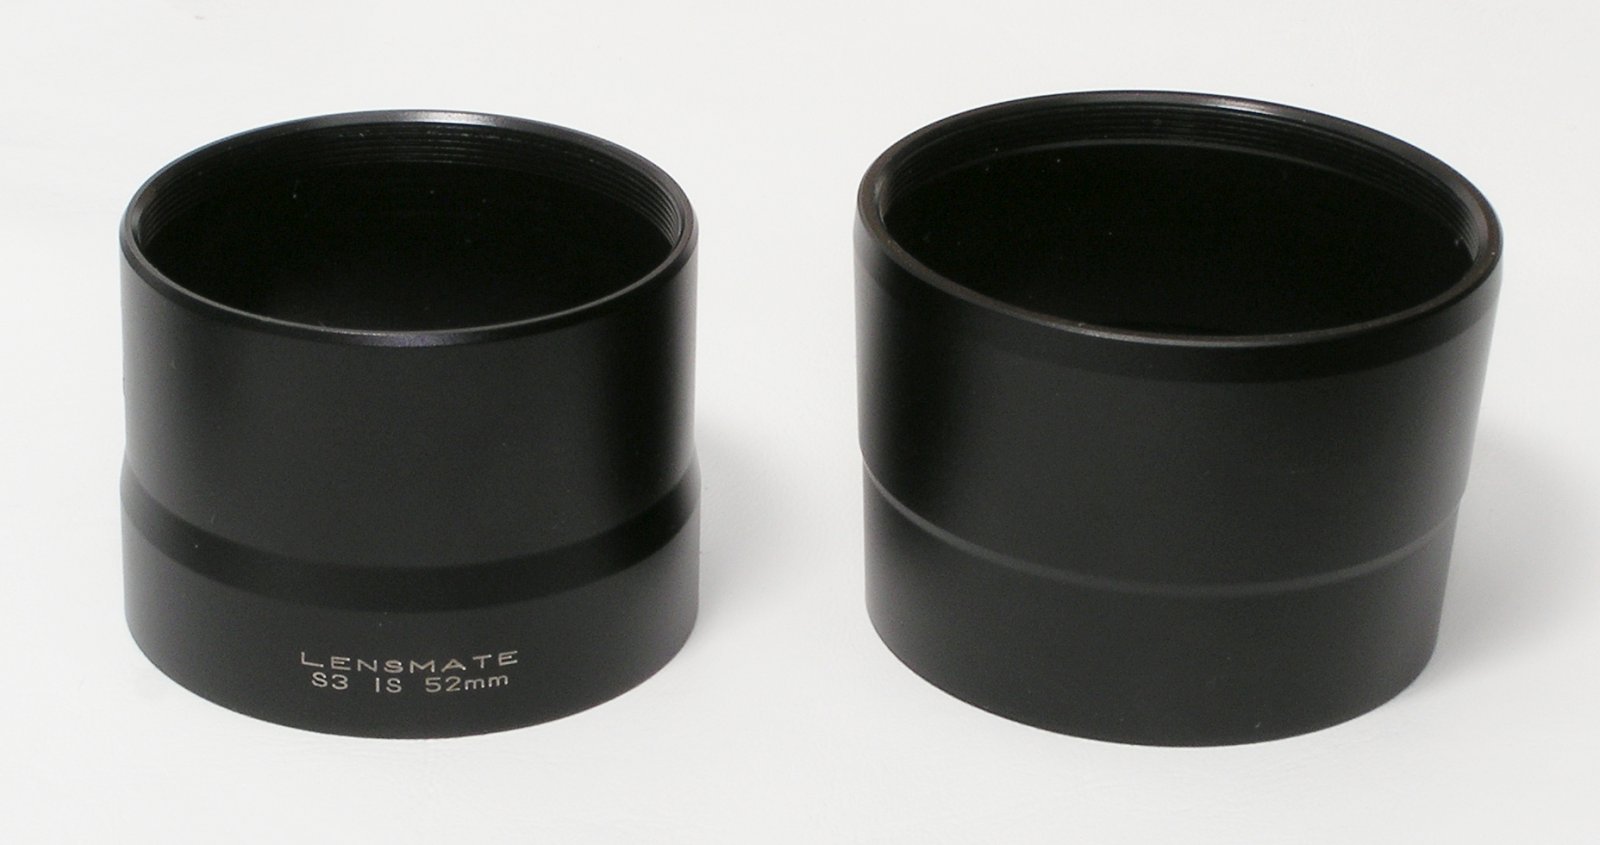
LensMate 52mm Adapter and LensMate 58mm Adapter

The photo below shows most of the lenses and adapters I'll be using in this tutorial. From left to right...
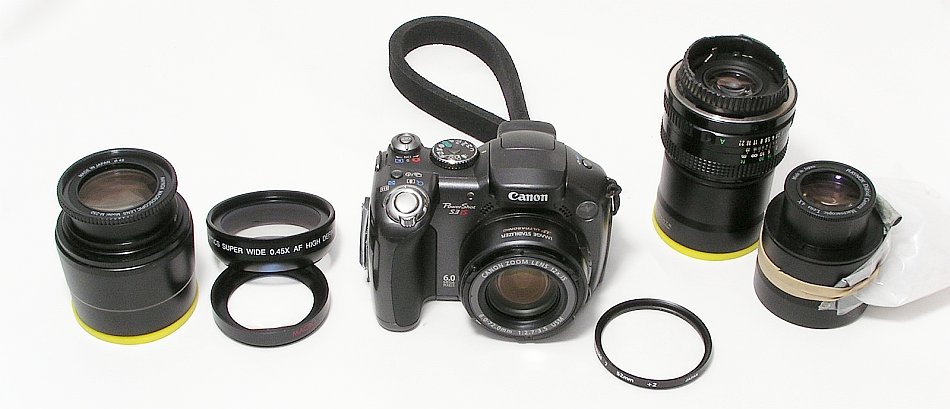
  • This (far left below) is a Raynox DCR-250 mounted in a 58mm LensMate adapter. Since the lens has 43mm threads, I had to use step-down rings to make it fit. The Raynox-supplied clip in adapter worked well enough but I felt more comfortable with a threaded mounting connection. This lens is suitable for relatively large subjects (~3.5" maximum with the Canon S3). It can provide good resolution for items 1/4" (~6mm) or smaller.
  • The next piece is actually a cheap wide angle adapter (widely available on eBay). Many of these adapters are in two pieces. The rear section of the lens can be used as a macro lens. I believe that these were originally designed to be used with camcorders which have a much lower resolution than most digital cameras. For camcorders, this lens may have worked well enough. For any sort of critical macro photography, the macro lens is virtually useless. Of course, that's my opinion. I'll show the results with several lenses later (including this one).  
  • Just to the right of the camera, you can see a simple close-up lens. These typically come in sets that include +1, +2 and +4 diopter lenses. These are relatively good for what they cost (~$30/set). This one is a +2 and it's the most useful for the work I've done using this sort of lens. In a pinch, you can stack the lenses to get closer to the subject (larger image in frame) but the minor problems that you encounter with a single lens are compounded when multiple lenses are stacked. 
  • The large assembly in the back is a 50mm lens attached to a LensMate adapter using a macro coupler ring (52mm male threads on both sides of the ring). The lens is reversed (relative to the way it's normally used). This can work relatively well but sometimes it's difficult to get the lens' diaphragm to open fully. Since the lens is so long and the working distance relatively short, it's difficult to get enough light (from the flash) on the subject. This can be overcome by using a reflective type enclosure which will be covered later.  
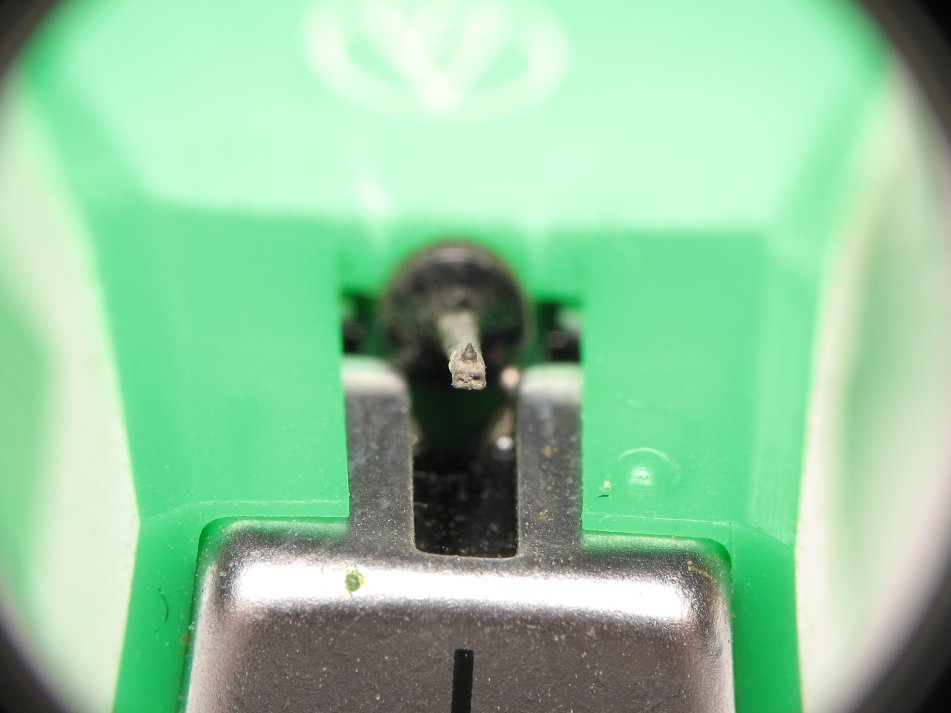
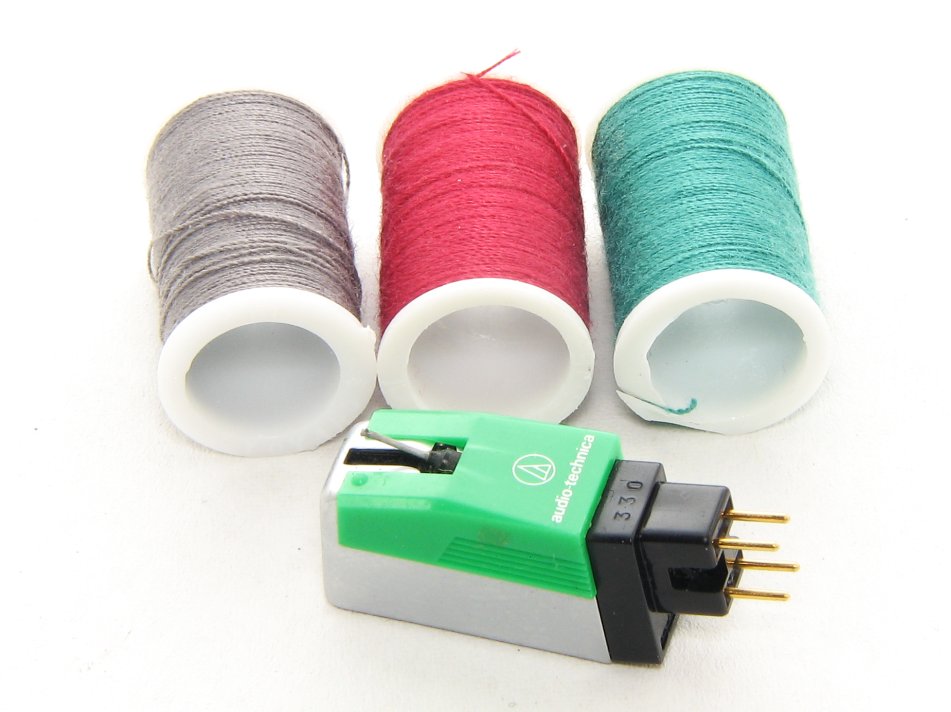
  • Last but certainly not least is the Raynox MSN-202 lens on another LensMate adapter. This lens is suitable for very small subjects. Something the size of a mosquito is near the maximum for this lens. It's great for very tiny subjects (like the images of the mites and the diamond phonograph stylus found on this site).  

Canon S3 and Various Close-Up/Macro Lenses

For someone just getting started in macro photography, I'd recommend the Raynox DCR-250. It's the best all-around lens of those shown. If you find you want to photograph smaller items, the MSN-202 would be a great choice. If you need to photograph relatively large items (up to ~2ft in length), the close-up diopter lenses can do a relatively good job. They allow your camera to focus closer than they are able with no close-up lens. With all of the lenses, you can use the camera's zoom to vary the amount of magnification.

The quality of the 'diopter' type lenses mentioned above can vary greatly. The cheapest (as you would expect) are the lowest quality and have the most optical distortion. Some of the more well respected names (like Hoya) produce somewhat better quality lenses which produce better images. The diopter-type lenses, for the most part, are only single element (only one piece of glass) accessory lenses. After years of procrastination, I finally purchased the Canon +2 diopter lens (model number 500D -- the D is significant). It's significantly better than any of the other diopter type lenses I've used. It's clear from edge to edge (corner to corner) and there is essentially no chromatic aberration. Chromatic aberration (prism effect near the outer edges and corners of the image) is a significant problem with all of the single element diopter type lenses that I've tried. The 500D is a dual element lens (hence the D in the model number). Everything about the 500D makes it well worth the higher asking price.

To best compare the sample photos in the next paragraph...
Click on the link to open it in a new window. This will allow you to view it full size. If you're using Firefox or Chrome, simply click on the image (after opening it in a new window) to view it full size. If you want to open all of the images in the next paragraph at the same time, right-click the links and select 'open in new tab' from the menu. Do this for all 3 links. If you simply click on the link, all images will open in the same tab and you will only be able to view one at a time. If you want to zoom in on the exact same area for each image, position your cursor on precisely the same point on the photo in each tab and click. Then as you toggle between tabs, the same area will be shown. Notice how the colors, especially the white, has the prism effect near the edge, particularly in the single element Hoya and generic lens.

THIS (IMG_9783) is an image taken with the Hoya HMC +2 diopter lens (which is reasonably good for a single element lens). The contrast is relatively good and the focus is fairly good. THIS (IMG_9781) is with the 500D. The contrast and focus is very good (probably as good as the Canon S3 can produce. The chromatic aberration is minimal and may be more from the camera than from the close-up lens. THIS (IMG_9784) was taken with a run_of_the_mill cheap +2 lens. The name isn't important because it's from one of the many companies that simply stamp their name on products that are made by a generic (lowest bidder) manufacturer. As you can see, the contrast is poor, the overall clarity is poor and the chromatic aberration is quite bad. I took several photos to ensure that this wasn't just an out of focus image. All of the photos taken with this lens were about the same.

For those curious about the components in the photo, this is a small section of a circuit board in an audio amplifier. The small components with the black center and white text are resistors. To get a sense of scale, most are approximately 0.080"x0.050".

Click to Return to the Main Menu

Choosing the Best Setup:
When you need to photograph an object, you must make a few decisions. These will determine the quality of the photos. When experimenting, you need to take careful notes. This file will remind you to note the most basic information. Use the 'click to print' button for best results.

Choosing the correct distance to the object is important. If possible, set the object at a distance that's approximately in the middle of the range of focus for the camera/lens you have. With small objects, you may have a problem getting the object large enough in the photo. For example, if your camera has only a 4x zoom and will not focus closer than 10 feet, a relatively small object may be very tiny in the resulting photo. To make the object larger, you'll have to get closer. Since the camera won't focus closer, you'll need accessory lenses. The diopter lenses or the dedicated macro close-up lenses will allow you to get closer to the object which will make it larger in the photo. Various lenses will be covered as you work your way through the site.

Lighting is very important. If you have only a basic point and shoot type camera that doesn't allow any manual adjustments (shutter speed, flash power...), you'll have to try the various 'scene' settings to get the lighting right. It is likely that you'll have to use a flash diffuser to prevent dumping too much light on the center of the object. I'll cover many types of diffusers. To adjust the light levels, you can adjust the distance between the camera/flash and the object, you can adjust the shutter time (when using long exposures) and you can change the aperture (f-number) of the lens (smaller aperture, higher f-number = less light, darker image). All of this is easier if you use the full manual mode (if that's available on your camera).

You'll have to decide whether to use the flash or not. There's no way to determine which is best without trying both. Some objects work better with long exposure times. Others work better with the flash (especially if your camera employs noise reduction on all photos with long exposure time).

The background and work surface are also important. You don't want the object to get lost in the background. You also want the colors of the background to work well with the object. Anything in the grayscale will generally be OK for the background (assuming that the object is not mostly gray). Strong colors must be selected carefully.

Click to Return to the Main Menu

Flash Diffusers:
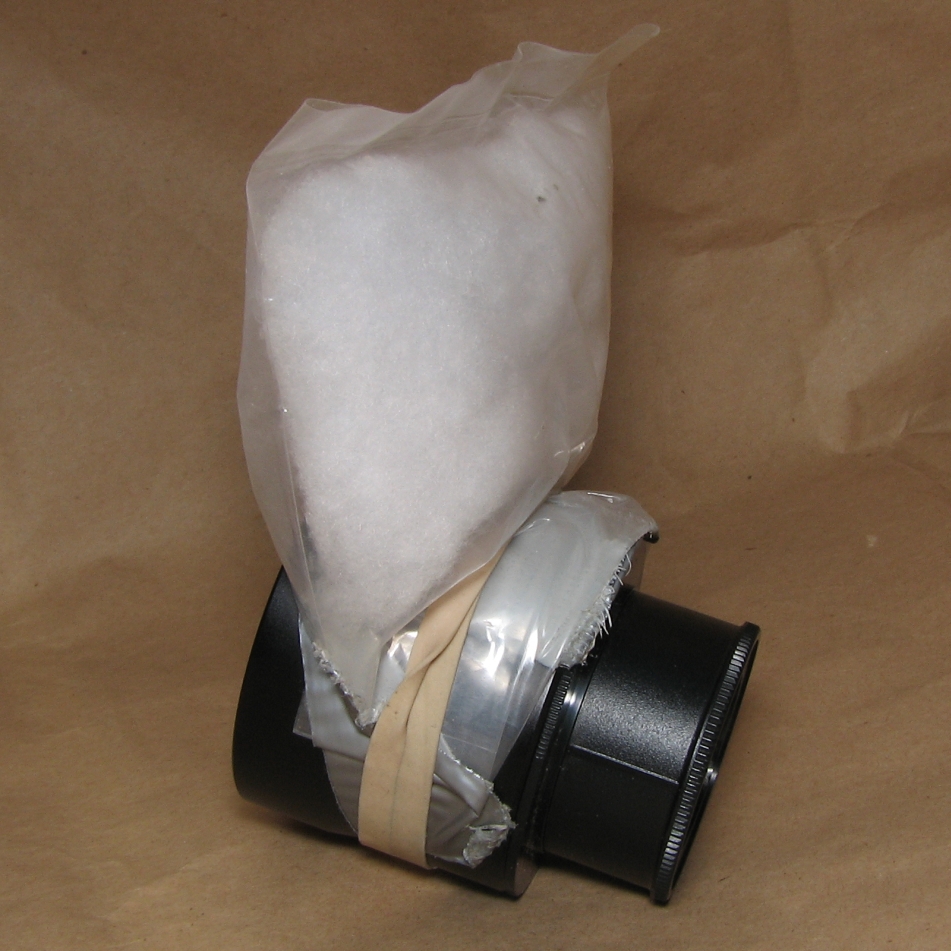
In the previous image, you may have noticed the plastic bag on the adapter. The flash on most cameras is designed to illuminate subjects at a fair distance from the camera. When doing macro work, the flash is typically too bright. Most cameras can reduce the flash power when they focus on close subjects but when the camera has a third-party close-up lens on it, the camera may not compensate properly. The plastic bag contains poly-fil material. It serves to diffuse the flash. It both reduces the light reaching the subject as well as spreading the light. There are many different types of home-made diffusers. I'll show you several. In general, I'm not concerned about the appearance of the camera or lenses. I use duct tape for all sorts of things (something I learned from Red Green :) from holding the rubber port covers out of the way of the port (as you can see that I've done on my camera) to blocking light from the diffuser (well placed strips of tape can reduce the output of the diffuser).

If you want to look and sound more professional, use "gaffer's" tape instead of duct tape. It has the same basic properties as duct tape except for the adhesive (which is not supposed to transfer onto the surface to which the tape is applied). I purchased a roll manufactured by Shurtape and it works very well (strong and no sticky adhesive residue).

A note about 'macro' photography... In the world of film cameras, the term macro applied to photos that produced a life-size image on the film. Here I use the term a little more loosely.

The next 3 photos show how the flash functions with and without diffusers. All are with the camera set to super macro (no close-up or accessory macro lens). I don't like the super macro function on this camera because there is too much barrel distortion (a rectangular object would have a shape similar to an old wooden rain barrel). The first image has no diffuser. Here I left the 58mm adapter in place. Normally, you would get some darkening of the bottom of the image but not quite this bad. As you can see, where the flash hit, the image is blown out (bright areas at/beyond the maximum the camera can process).
Close-Up Photo No Diffuser

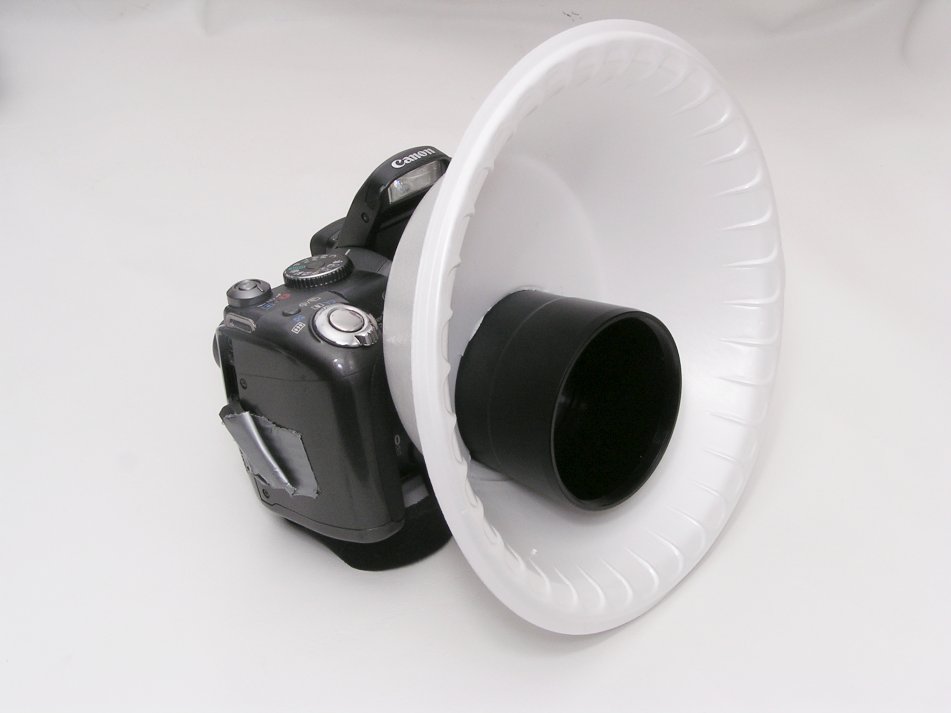
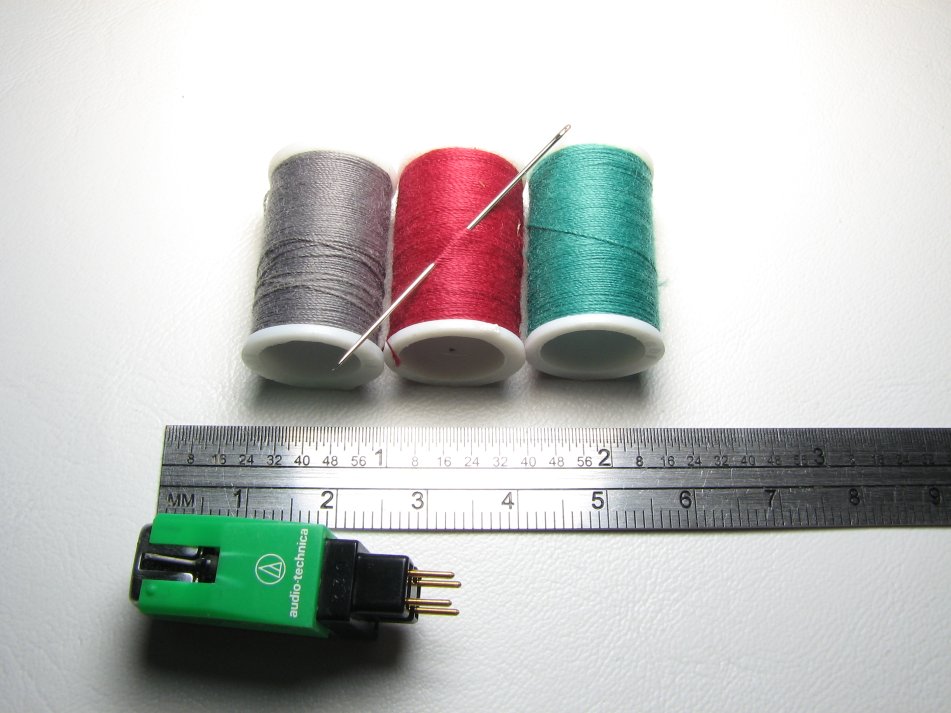
Below, I used a 'bowl' diffuser. For this type of diffuser, you simply cut a hole in a styrofoam bowl so that it fits snuggly onto the adapter or lens barrel. I press the back side of the adapter into the bowl to mark it. Cut it a little smaller than needed and make a few relief cuts to allow it to slide on. This prevents it from turning. As you can see, this is a cumbersome diffuser. If you need to get the camera close to a surface (to allow a low angle shot on a subject), it's difficult to do with this diffuser.
Close-Up Photo Styrofoam Bowl Diffuser

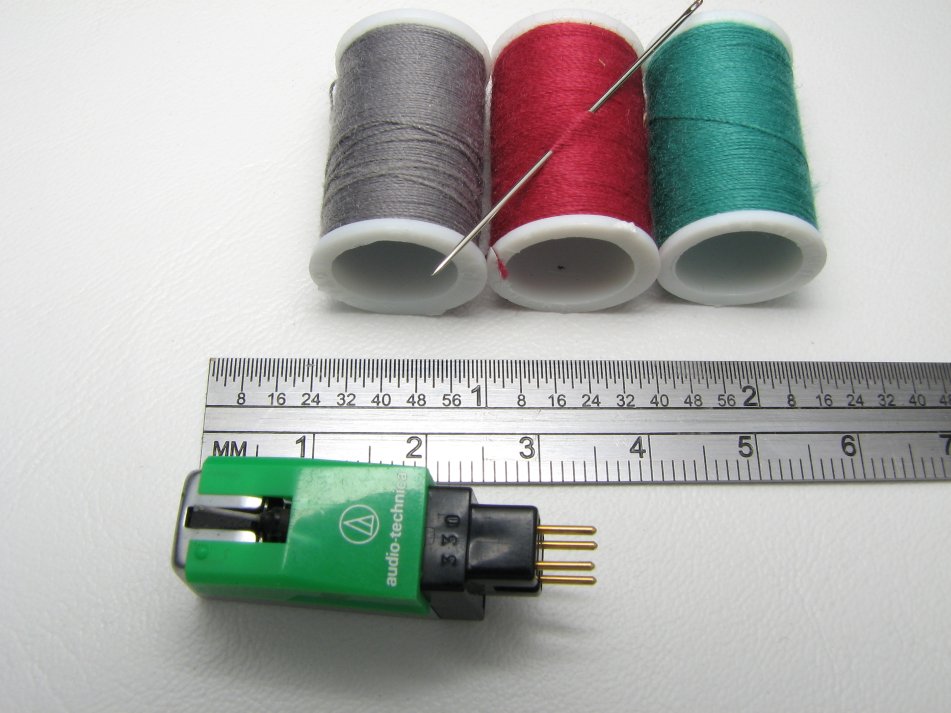
In this next image, I used a 'can' diffuser. The results were essentially the same as the bowl diffuser. The light is a little less diffused and the shadows more intense but very good otherwise. This diffuser is probably a little better overall because it more easily adjusted and more durable. When using something like the Raynox DCR-250, this makes a good diffuser because it projects a more concentrated beam, a little farther than the bowl diffuser.
Close-Up Photo Can-Type Diffuser

For those who want to see the diffusers on the camera, your wait is over. You can change the light output of the bowl type diffuser by rotating it (if you cut the hole off-center as I've done). You should experiment to see what works best for you.

This shows a more durable version of the bowl diffuser. Sometimes, the relief cuts run making the diffuser fit too loosely. Punching round holes (with a paper hole punch) distributes the force and helps to prevent tearing. If you have trouble with light leaking through the holes (I haven't as of yet), use only relief cuts or use shorter relief cuts so the holes are closer to the lens adapter. This also works. If/when the diffuser gets loose or if it tends to slip off of the adapter tube, wrap rubber bands around the tube at the point where you want to diffuser to ride. Do not do this on a retracting lens barrel. The rubber bands could cause damage to the lens mechanism.
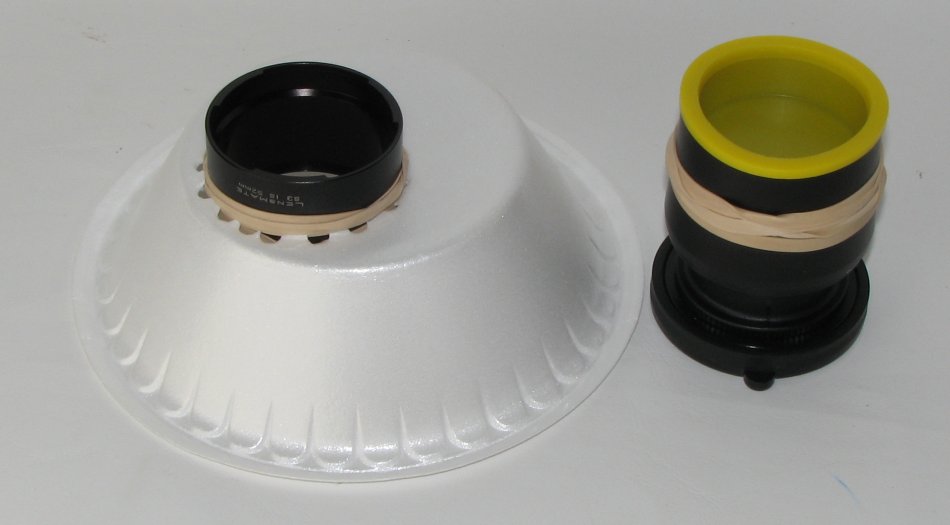
Slipping Bowl Diffuser Remedy

Styrofoam Bowl Diffuser On Camera

I can't take credit for the idea of the can type diffuser. I found something similar on a forum but I can't remember where. The photographer had some sort of egg shaped end on the can. Here I used a plastic container from Crystal Light Diet Lemonade. To make the diffuser, I cut the top out of an aluminum soda can and cut a slot in the back of the can so that the camera's flash can fit into the can. Then I made some relief cuts in the Crystal Light container and slid it over the can. There I fixed it in place with some duct tape (fancy, ain't it?). I hold it on the camera with a rubber band. Not having it firmly affixed to the camera is handy because you can vary the light output by pushing the can to the side (at an angle to the lens barrel).
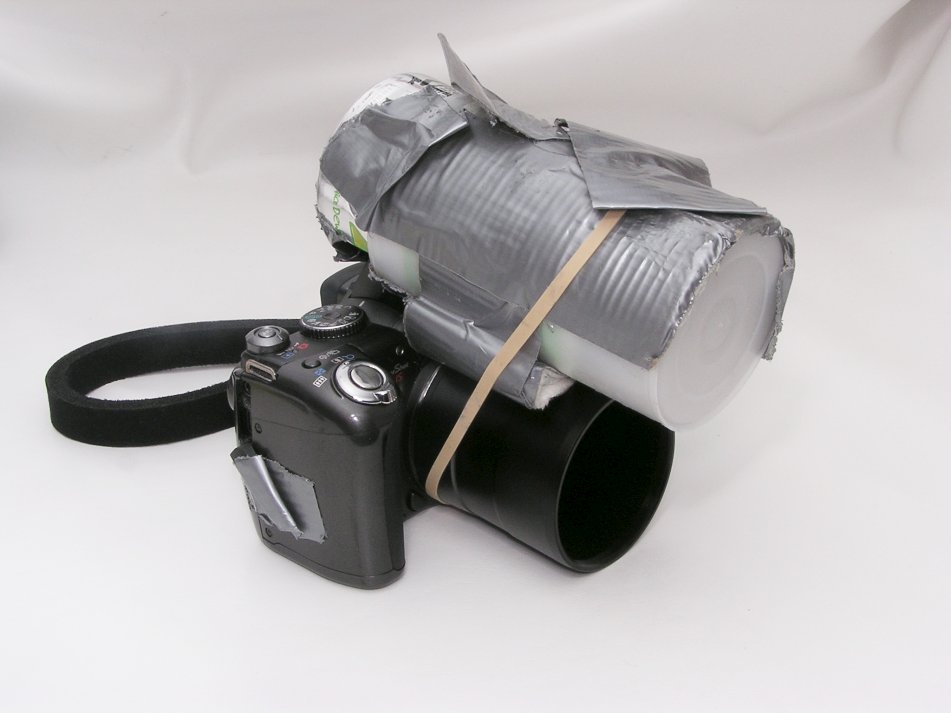
Can-Type Diffuser on Canon S3 and LensMate Adapter

When/if you build one of these, you should use something to protect the camera's finish where the flash goes into the can. I folded the edges of the can over but it wasn't enough. The padding in the center of the diffuser is folded paper towels (I told you this was macro on a budget). You can use something better if you'd like.
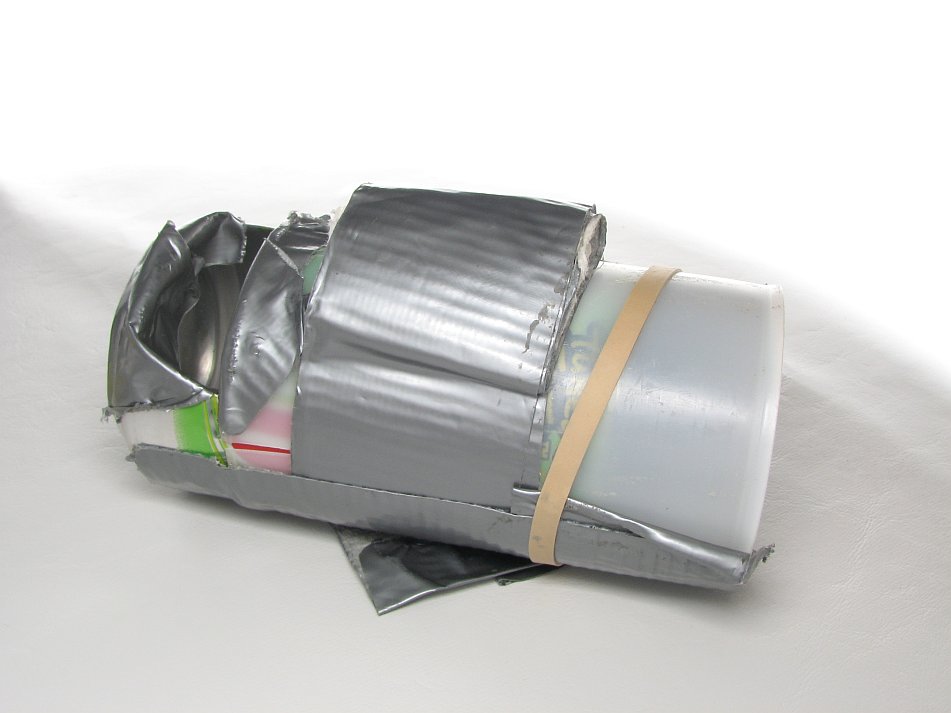
If you look at the bottom of the diffuser (top, as its oriented in the photo), you can see that it's open (open to light). If the diffuser extends beyond the front of the lens, this can cause lens flare. Use some opaque tape to cover the bottom of the diffuser. When you make tear-away pieces for this diffuser, fold the ends of the tape onto itself so it can not stick to anything. It makes it easier to remove. The opening in the bottom of the diffuser can be handy for some situations. The next two images were shot with the bottom of the diffuser open. This was done without any accessory lenses. The camera was set to super macro. There was lens flare at the top of each photo but that part was cropped.
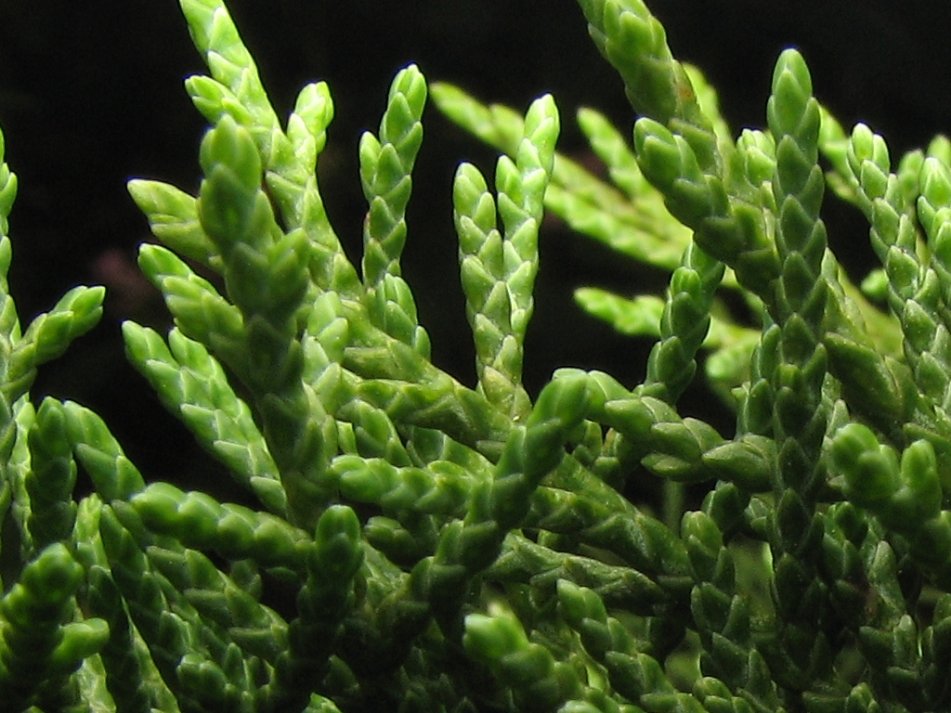
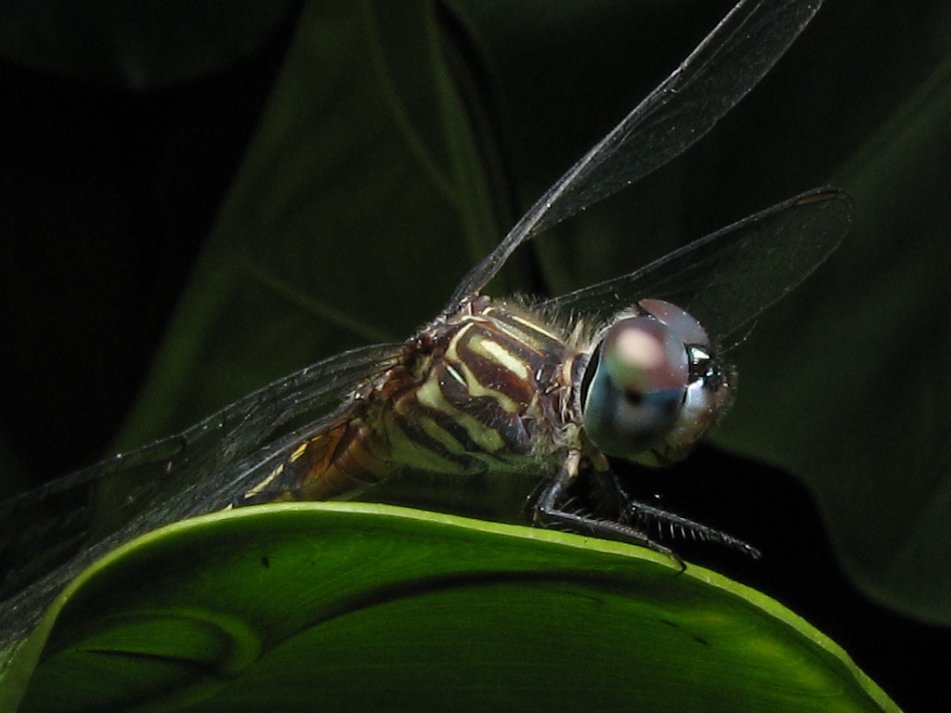
The photos above were taken in relatively bright daylight conditions. They look as if they were taken at night because a fast shutter speed and/or a small aperture was used.

Click to Return to the Main Menu

Depth of Field:
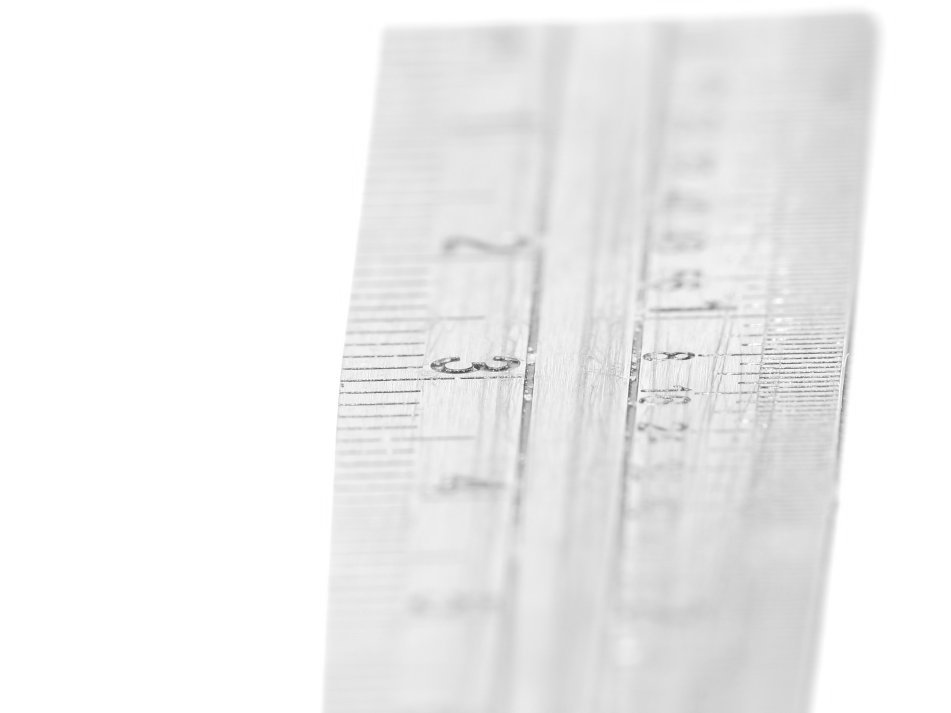
One of the most frustrating aspects of macro photography is the lack of 'depth of field'. The depth of field is the area of the photo from far to near that's in sharp focus. At high magnification, the DOF is significantly reduced. Sometimes it's better to use less magnification (simply don't zoom in as much) and then crop the image. This first photo was taken at high magnification. The full frame is just what you see (the image was resized but not cropped). As you can see, the #3 is in clear focus but little else is in focus. This would be OK if that's all you were interested in but that's rarely the case.

Poor/Shallow Depth-of-Field

This next image was taken with the same setup as the previous image but I zoomed out and cropped the resulting image. As you can see, much more is in focus.
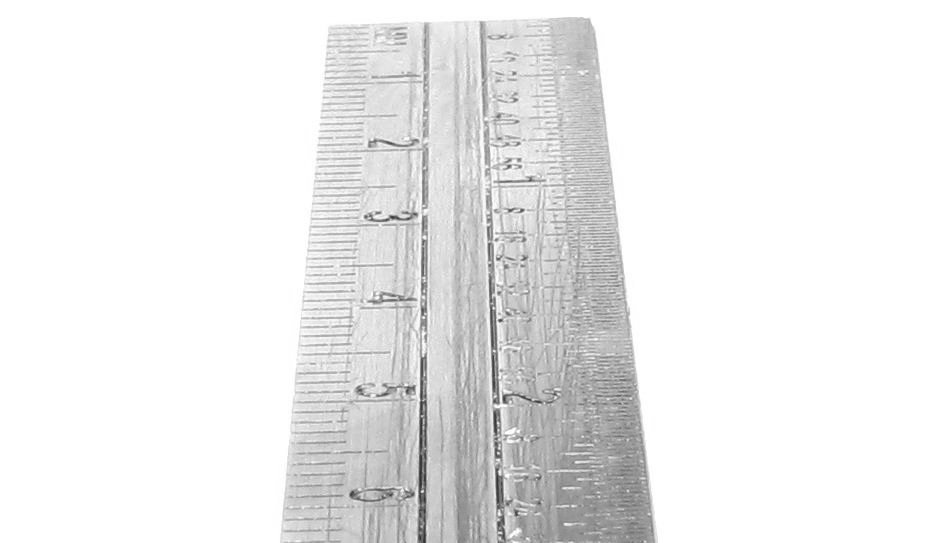
Improved Depth-of-Field

To get more depth of field, you need to use a higher F-number setting. For most digital cameras, the highest available F-stop is F8.0. When you increase the F value, you are shutting down the aperture in the lens of the camera. This reduces the light hitting the image sensor. To get sufficient lighting, you must either use extended shutter times or use a flash (or other source of light). If you're photographing a still subject, extended shutter times are OK. If you're photographing something that's moving (even very slightly), then you need to use a flash to prevent blurring.
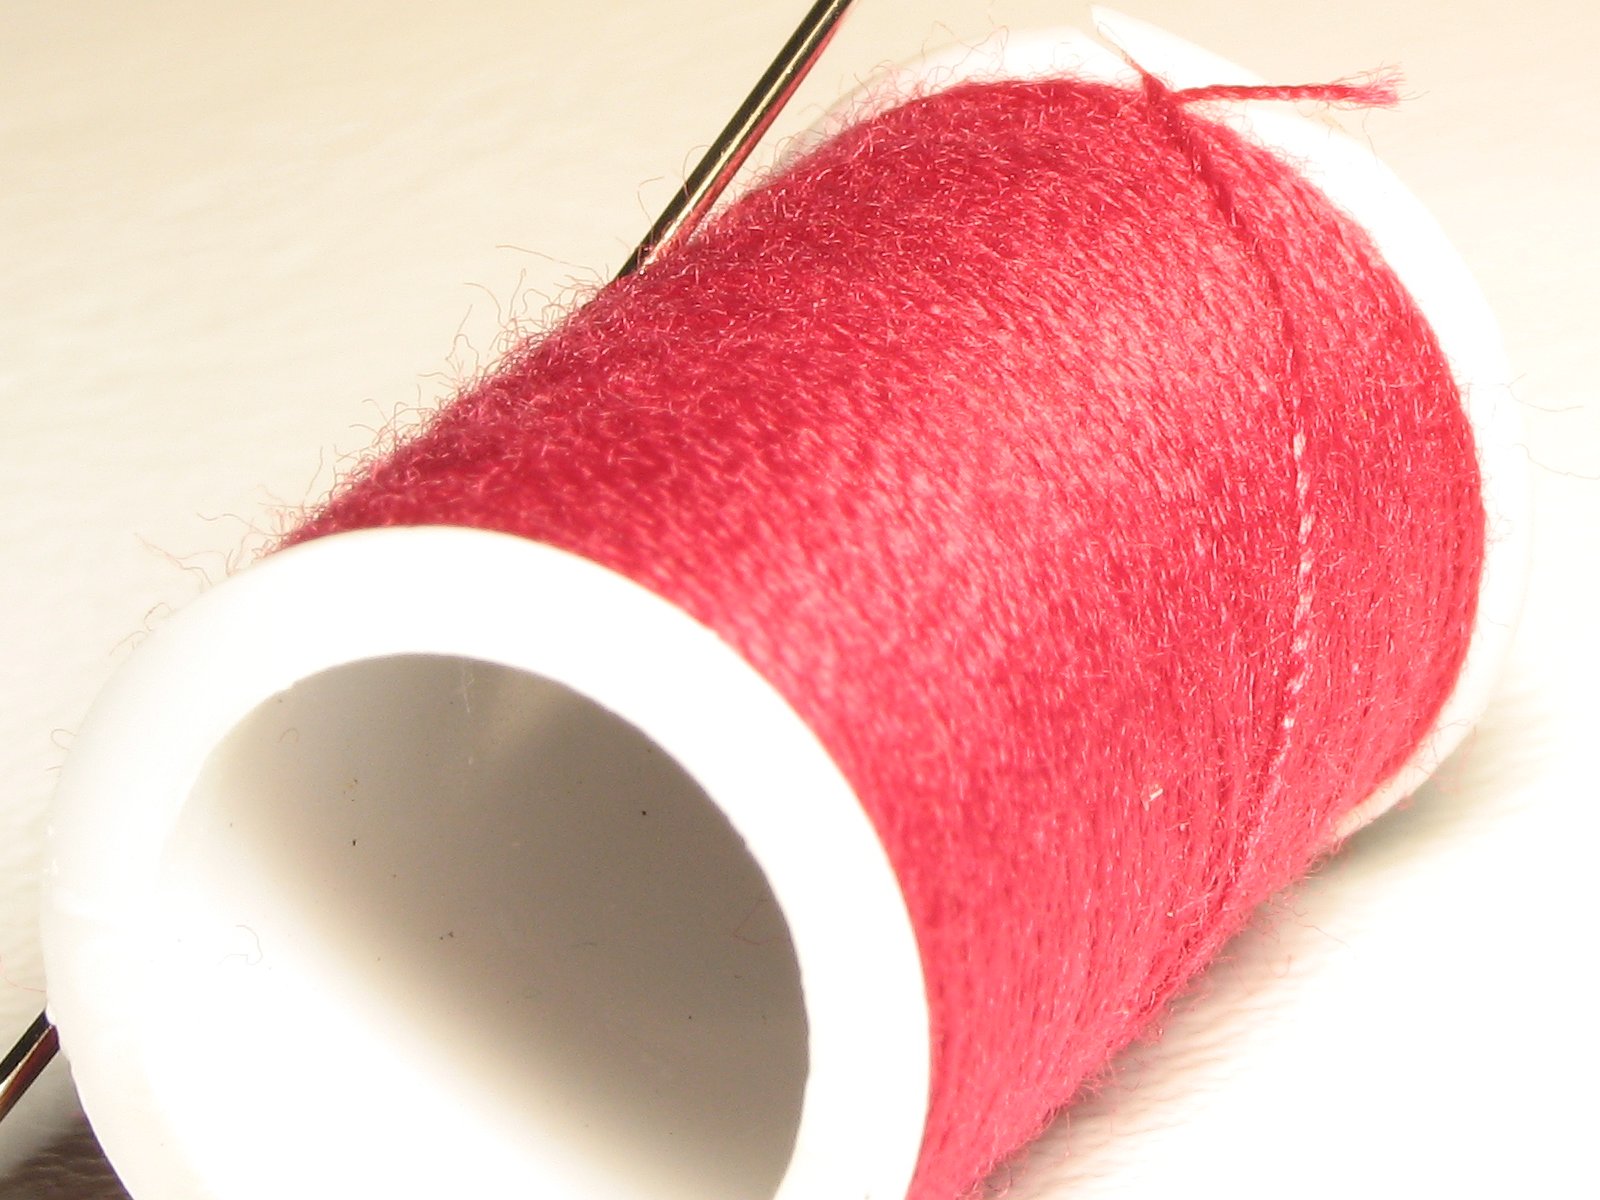
Good Depth-of-Field With Small Aperture - F8

I shot the image above at F8. The image below was taken at F3.5. The only change I had to make was the flash output. I had to almost completely cover the front of the can diffuser with tape to prevent blowing out the image. If you look at the fuzzies along the top edge of the spool, you can see that fewer are in sharp focus in the image shot at F3.5.
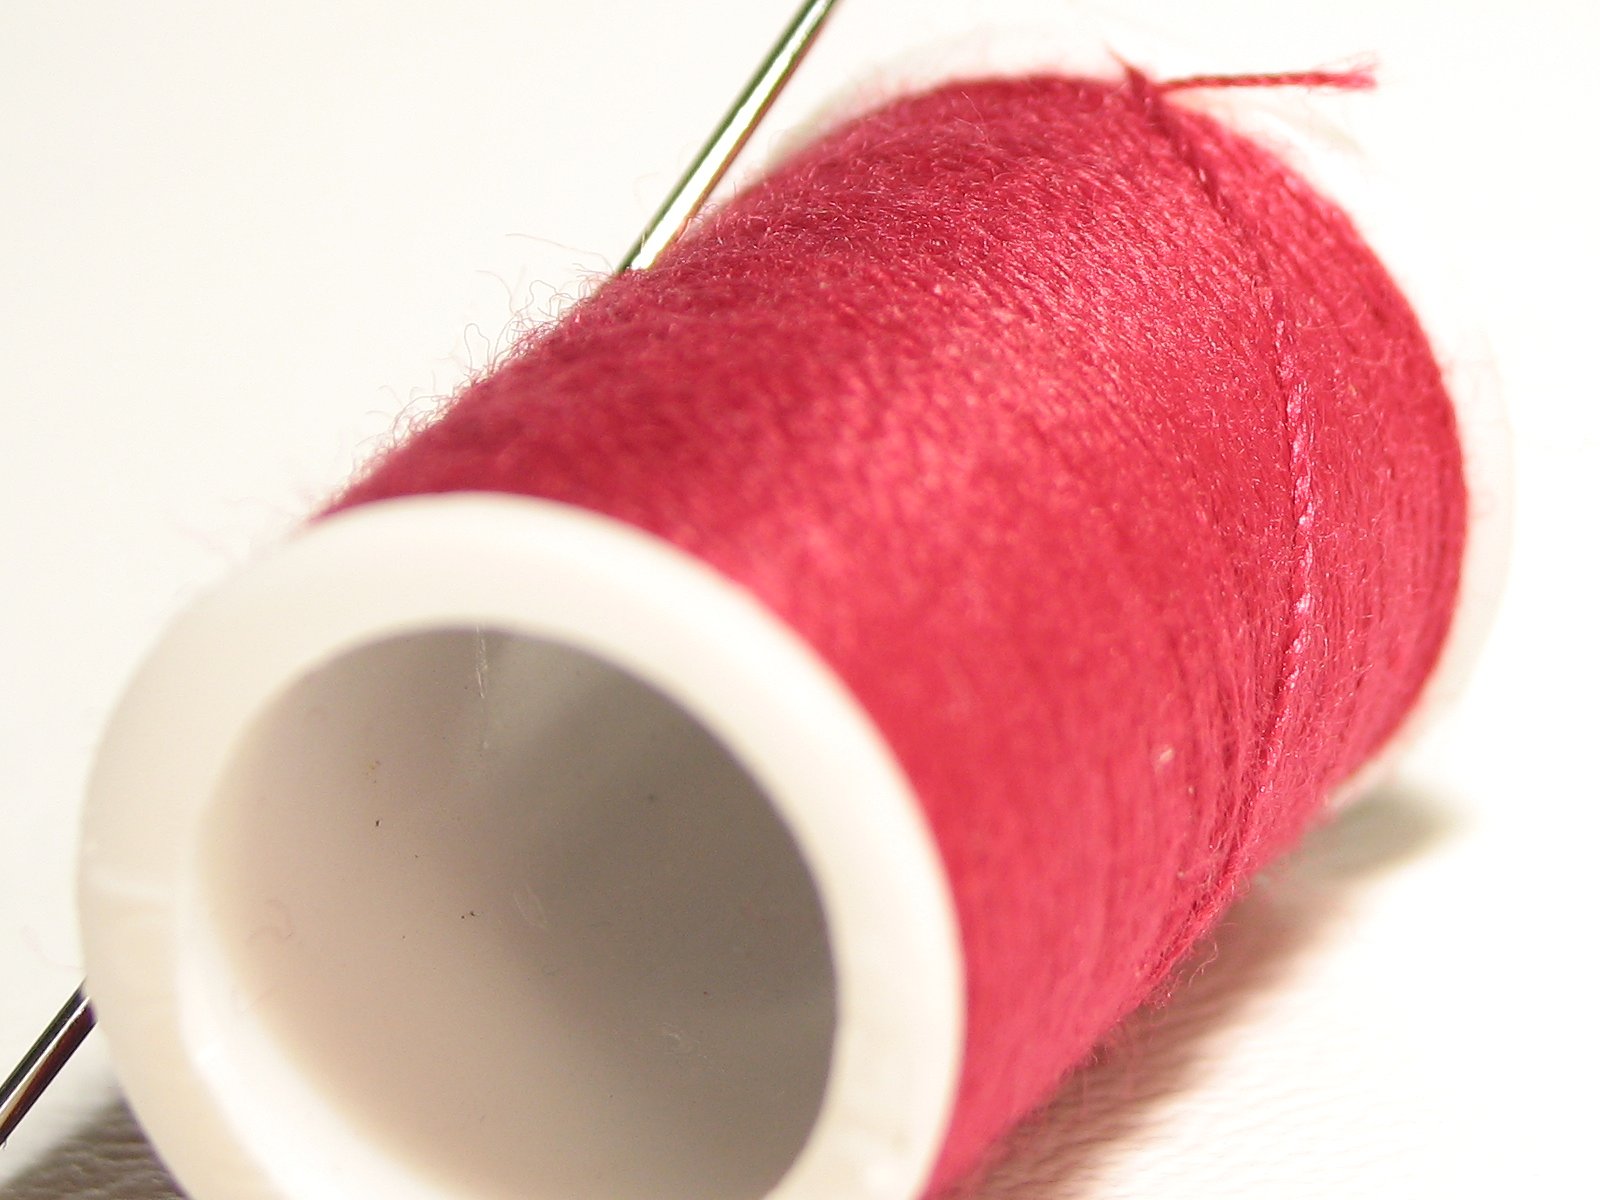
Shaoolwer Depth-of-Field With Large Aperture - F3.5

In the next image, you can see the small poly-fil diffuser in three different positions. Each one produces different results. The first produces the darkest image. Moving it to a vertical position, you get more light on the subject. In the full forward position, the difference is subtle but sometimes you only need a subtle change to get the lighting just right. Of course, intermediate positions cast varying amounts of light on the subject. This is a very flexible diffuser. I use it more than any other.

Note: The image above is a Flash graphic file. You can right-click to zoom in. Use your left mouse button to navigate when zoomed in.
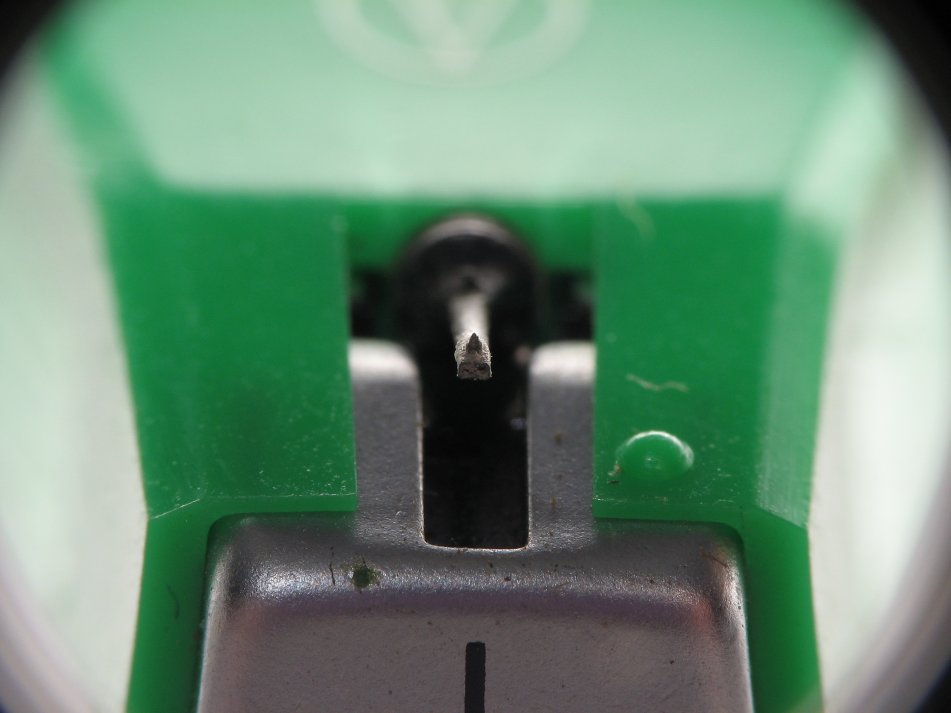
If you look at the glare on the top of the plastic, the front of the metal housing and the lighting on the top of the tube (in the images above and below), you can see differences due to the difference in the angle of the diffuser.
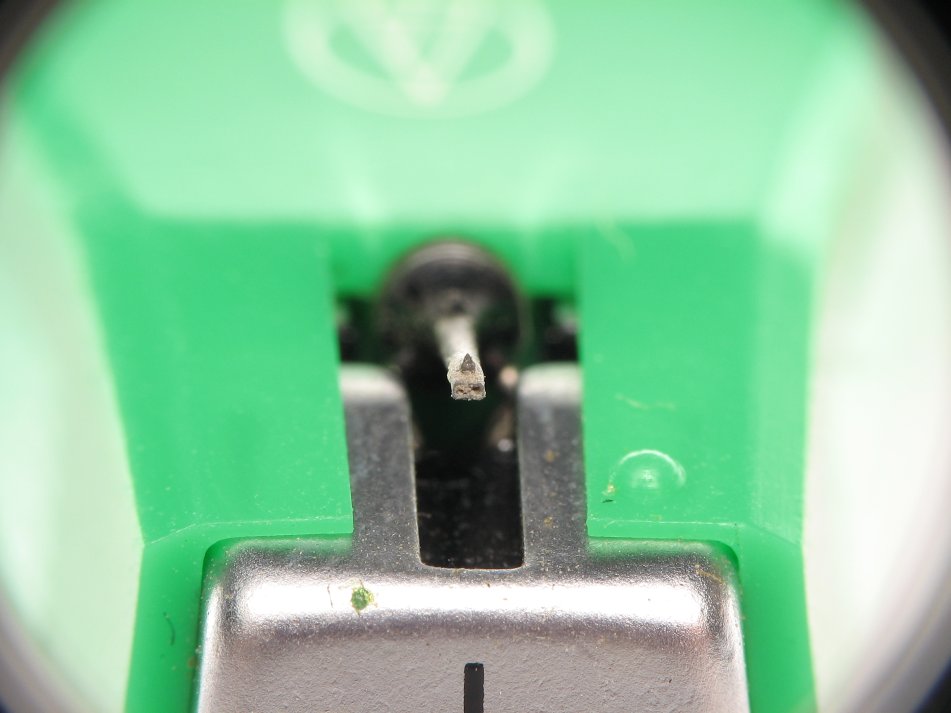
For those who want to see the stylus up close... click. That photo was taken with the Canon S3. If you're really on a budget, you can still take nice macros. This photo is of the same subject but was taken with a camera (Olympus C-740) that you can buy used for less than $30 on eBay. Both were taken with the MSN-202 lens mounted on adapters made specifically for each camera.

A note about diffuser materials... Some materials will cause a color shift and produce inaccurate colors. To combat this, you can use the manual white-balance to compensate. I'm not sure how many cameras allow white balance to be used with the flash. My Olympus C-740 won't fire the flash when setting the white balance. This one (Canon S3) will fire the flash to set the white balance.

Below, you can see the C-740 with the close-up lens. I use the same type of diffuser (bag of poly-fil) on this camera. The wires go to a slave trigger that I use to fire a larger flash.

The C-740 and many other cameras fire a pre-flash before the main flash. It's used to make adjustments before the photo is taken. When I first wrote this section, there was no slave that would work with a pre-flash camera so I had to build my own slave trigger. The pre-flash would trigger the slaves so they would be discharged (and couldn't fire again) when the photo was taken. Now, slaves that allow for the pre-flash are available. If you're going to buy a slave trigger or a flash with a slave trigger built in and your camera has a pre-flash that cannot be switched off, make sure that the slave accessory you buy can fire properly with the pre-flash.
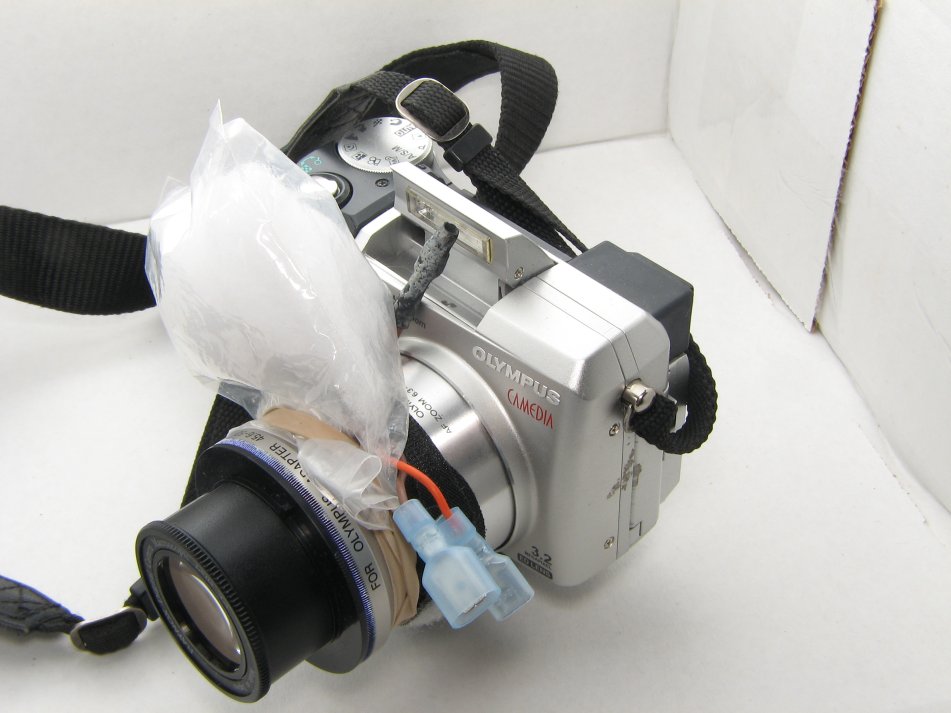
Olympus C-740 in Reflective Softbox

Note:
The C-740 above (and likely it's close relatives) won't retain settings when it's switched off or when the batteries are removed. This is generally due to a dead back-up battery for the memory. It's not available but I've replaced a couple of them and the cameras work properly afterwards. Email me if you have similar problems with your C-740.

Click to Return to the Main Menu

Monopod/Distance Gauge:
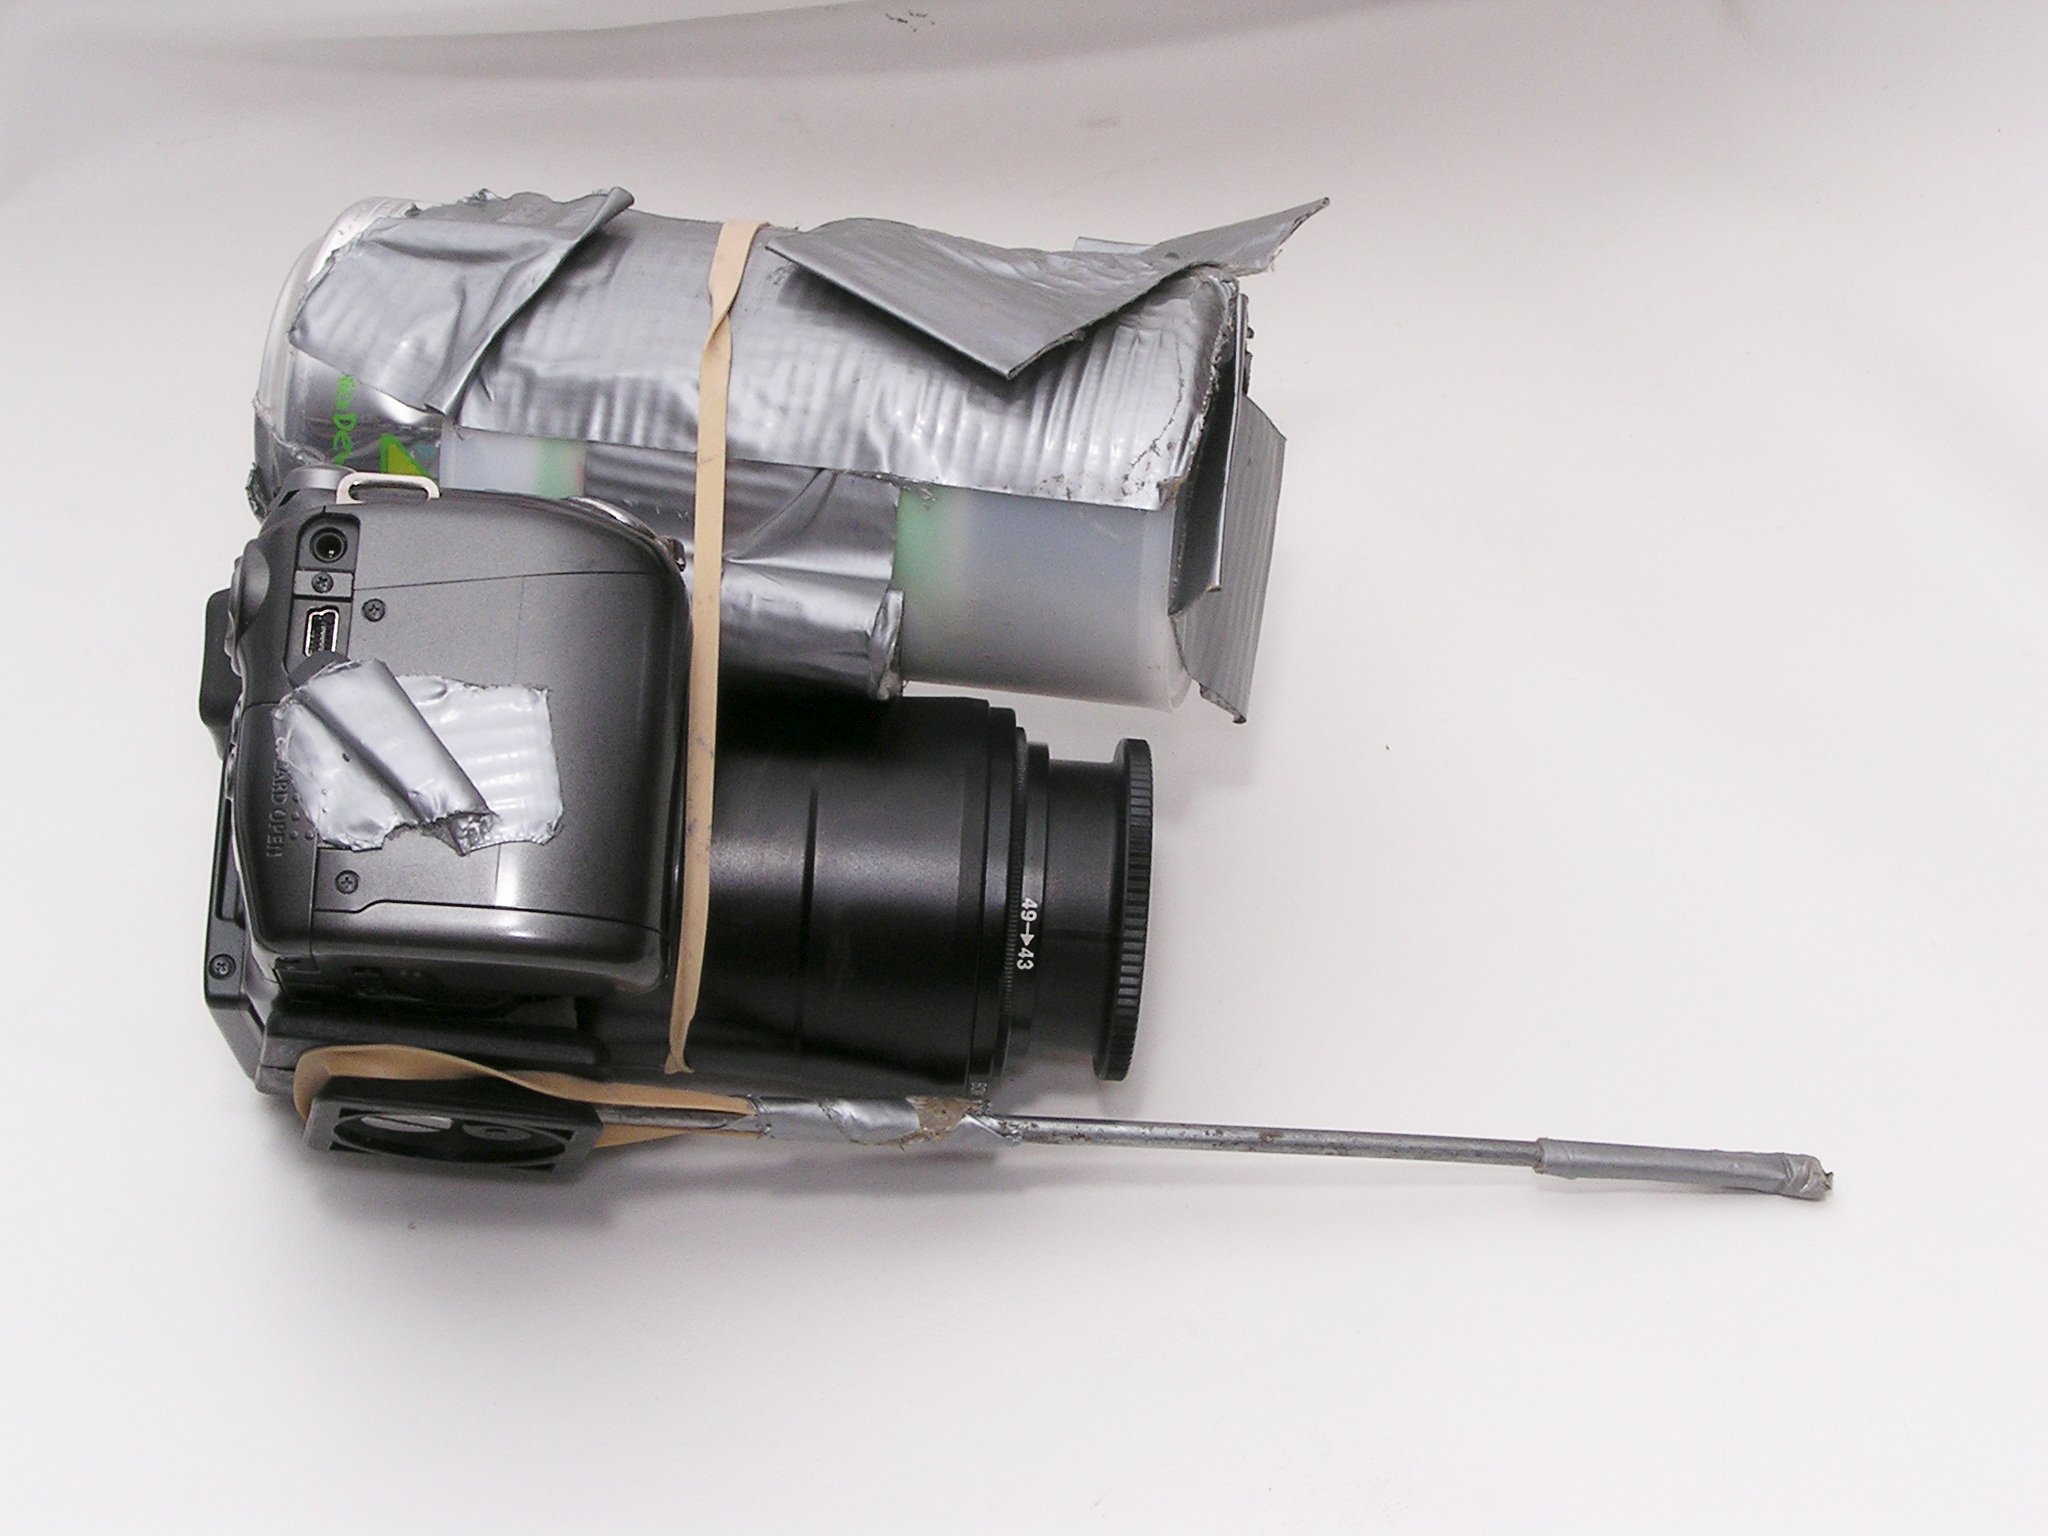
When photographing small critters that are on the move, it's difficult to get the camera to focus (particularly at high magnification) because it's difficult to find the small range in which the camera can focus. To make it easier to focus quickly, I rigged the following monopod (of sorts). I set the camera to manual focus and set the focus in the middle of its range. I then cut the rod to a length that would position the camera at that distance from the surface. When I set the rod on the surface of a specimen (generally very small - less than 5mm), the camera can focus very quickly. The tape is on the end to prevent slipping on hard smooth surfaces. The rubber band holds the rod in the hole I drilled in the tripod shoe (this didn't affect the operation of the shoe). The rod fits loosely. This works well when you need to fine-tune the area of focus without moving the rod on the surface. You can wedge your fingers between the rod and the lens adapter barrel to stabilize the camera.

Canon S3 With Can-Type Diffuser Showing Macro Monopod/Distance Gauge

Below, you can see a variation on the idea. I've clamped a small ruler between the camera body and the tripod shoe. Notice that this is the MSN-202 lens which has relatively high magnification. I use it when photographing small creatures. The fact that it's easily adjustable (loosen shoe and slide ruler) makes it easy to adjust to insects of various heights. Remember, at high magnification, you have a very shallow depth of field and therefore, the working distance is very critical. To photograph an individual that's only ~1mm high, you have to clamp the ruler in one position. For those insects with long legs, you have to extend the ruler slightly so that the camera can focus on the insect's body. Sometimes, if only a very slight adjustment is necessary, you can tilt the camera a little forward or backward and get the proper distance to allow the camera to focus. With the solid rod shown above, stabilizing the camera was only necessary 'sometimes'. With this flexible ruler, you MUST hold your fingers between the ruler and the lens adapter barrel to stabilize the camera.
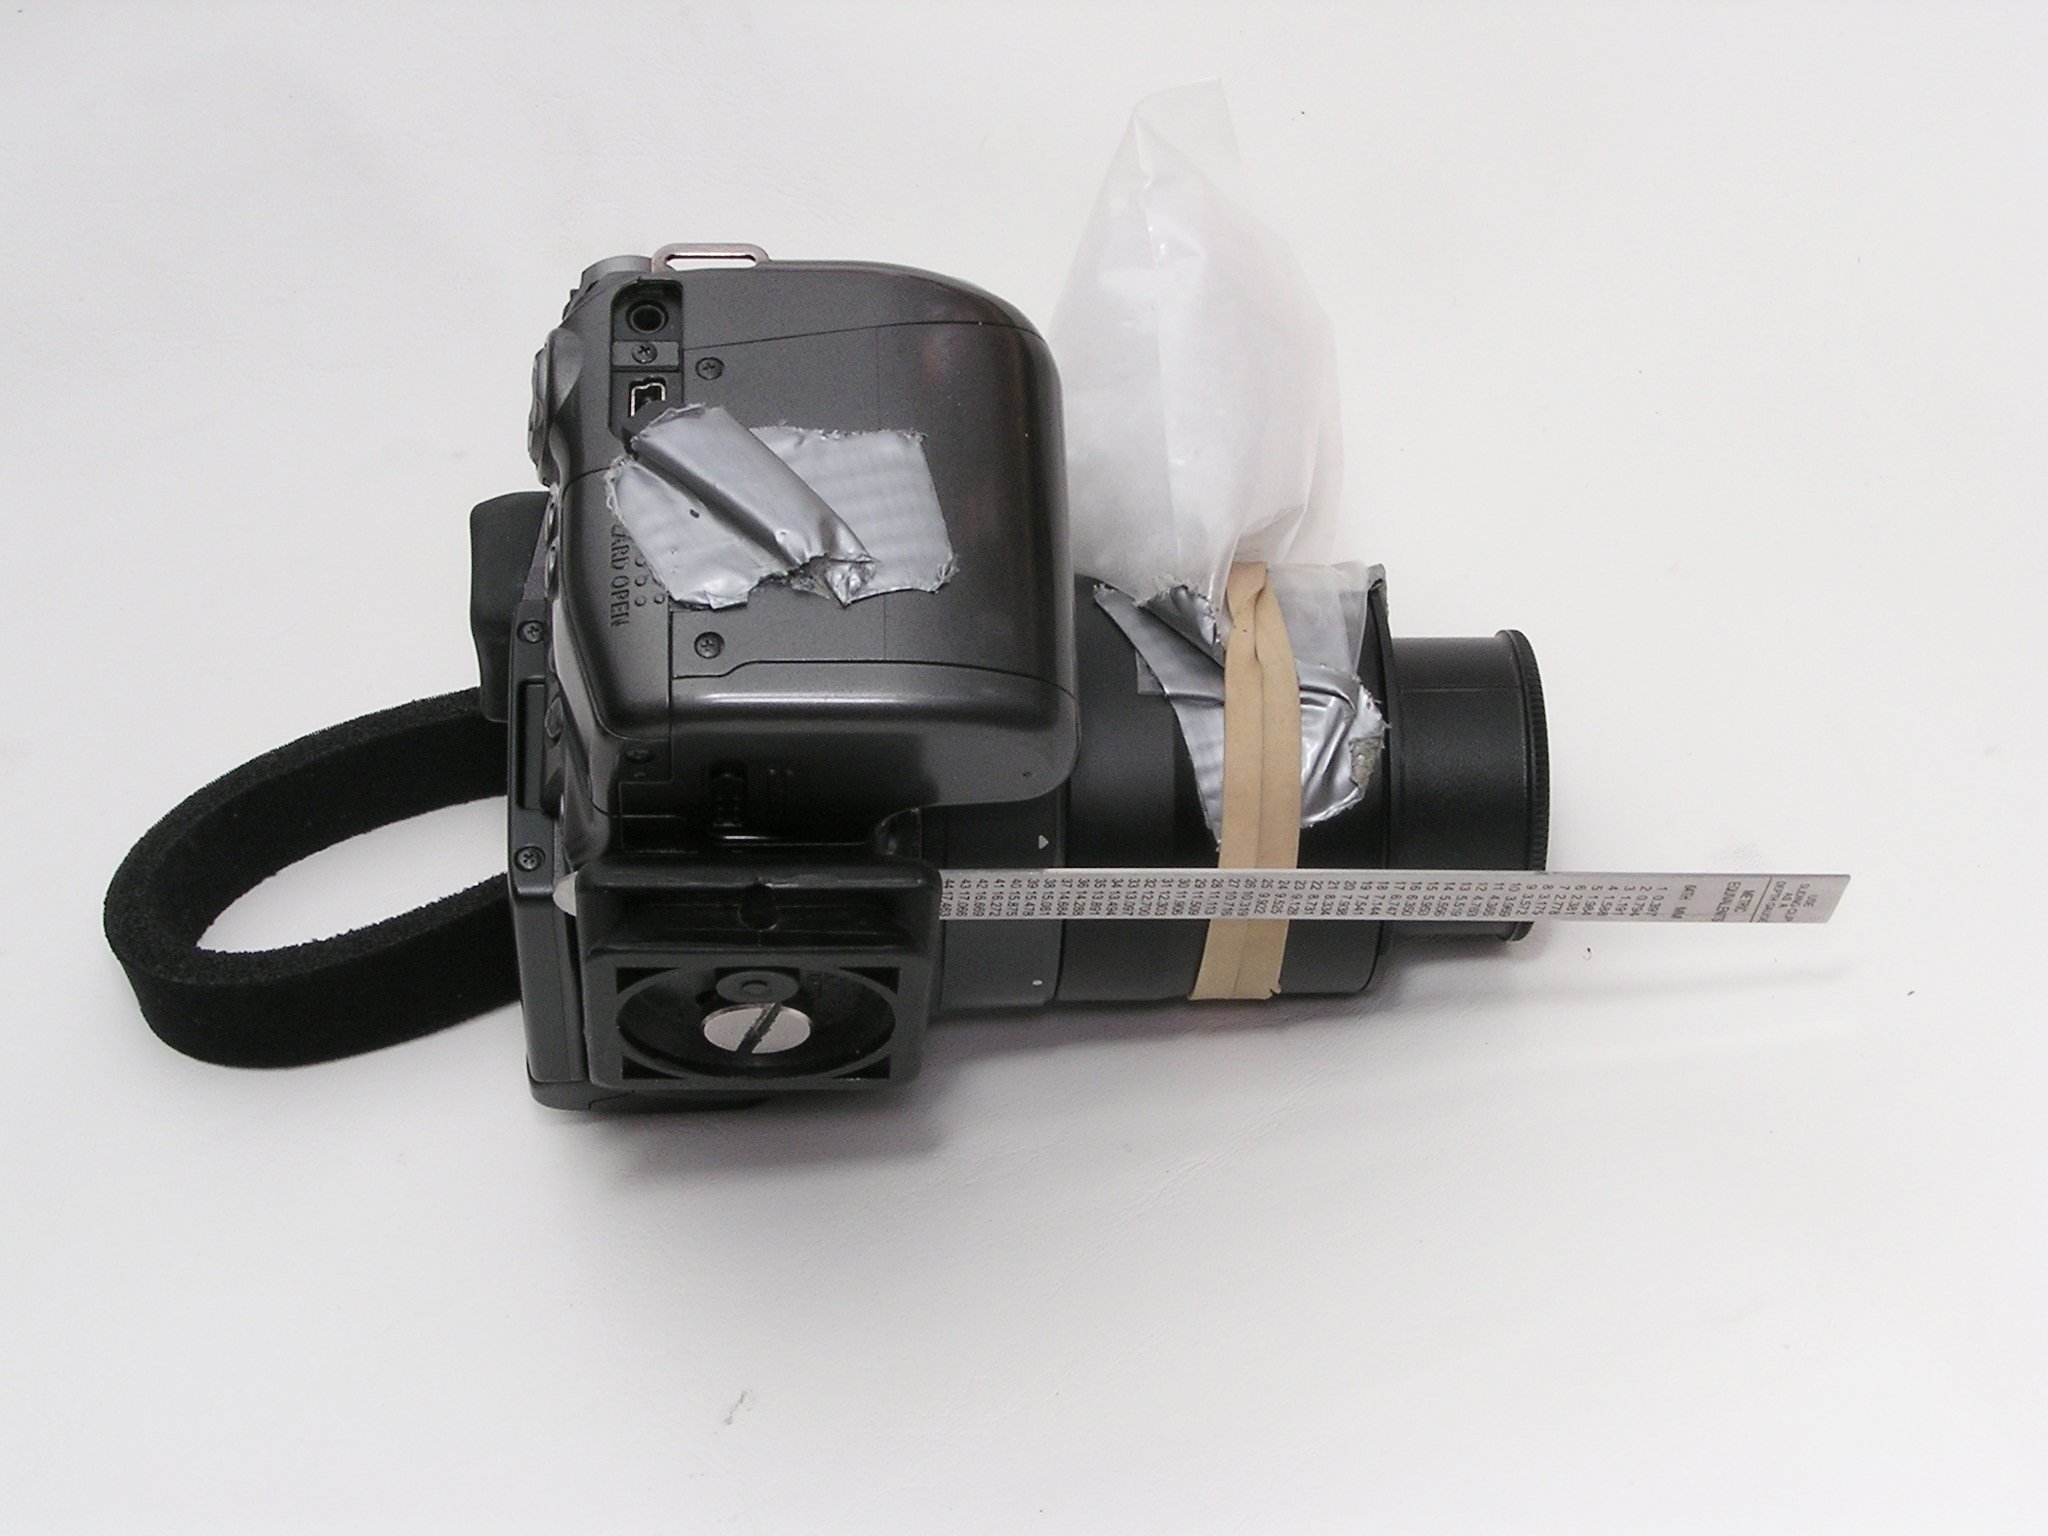
Canon S3 With Polyfil Diffuser Showing an Adjustable Macro Monopod/Distance Gauge
    Notes:
  • Both of the previous images are larger than shown here. Drag the image to the address bar of the browser to see it full sized. You may have to tell the browser not to automatically resize the image.  
  • The images above show you the approximate working distance for the Raynox DCR-250 and MSN-202 lenses on this camera.

Click to Return to the Main Menu

Color Cast from Surroundings:
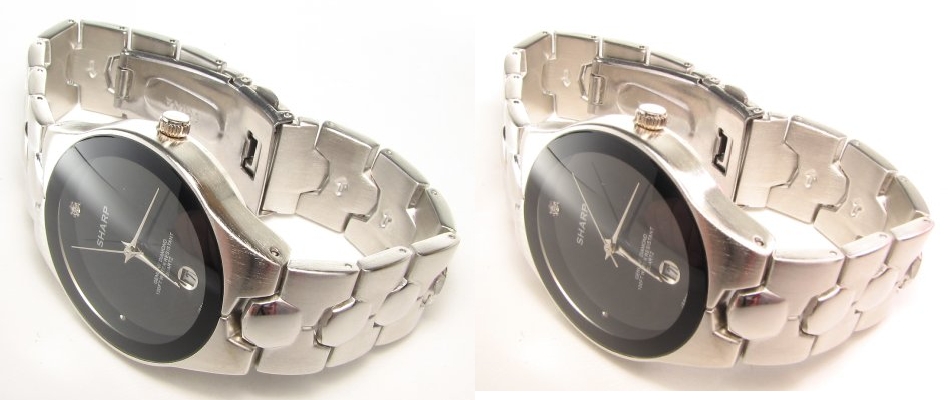
When photographing items that have to be color-correct, you need to be aware of your surroundings. It's best to have surroundings with neutral coloring (gray to white). If the surroundings include barriers or objects with intense colors, they can affect the color of the object you're photographing. In the next example, you can see that the watch on the left is silver/gray as it should be. The one on the right has a distinct pink cast to it. This was due to the flash bouncing off of an object several inches out of the frame (on the right).

Watch Photograph Showing Color Cast From Surroundings

Click to Return to the Main Menu

Extended Exposure:
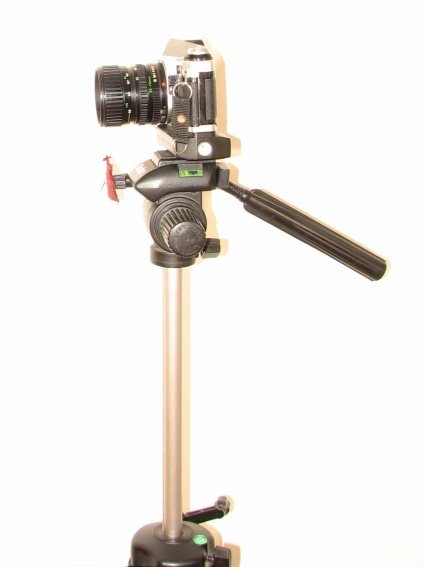
Earlier, I mentioned using long exposure times to compensate for a lack of light (particularly when using small apertures). This typically requires the use of a tripod and the timer on your camera. Since no tripod is infinitely rigid, you will move the camera slightly when you press the shutter button. Using the timer delays the opening of the shutter and allows you to remove your hand from the camera before the shutter opens.

When you set a tripod to the desired height, there are two ways to do it. You can use the small adjustable riser column or you can adjust the legs to something between all out or all in. It's best to have the riser column at its lowest position to provide the best stability. If it's difficult to get just the right height, you can set the leg height just under the desired height then use only a short length of the column for fine adjustment of the height. For many tripods, the riser is so weak that the camera will shake significantly from something as simple as pressing the shutter button. If you have a heavy camera on a weak tripod, it's possible that the camera will continue moving even after the 2 second delay timer.

Unstable Very Stable
Unstable Tripod Setup Stable Tripod Setup

Click to Return to the Main Menu

Light Sources:
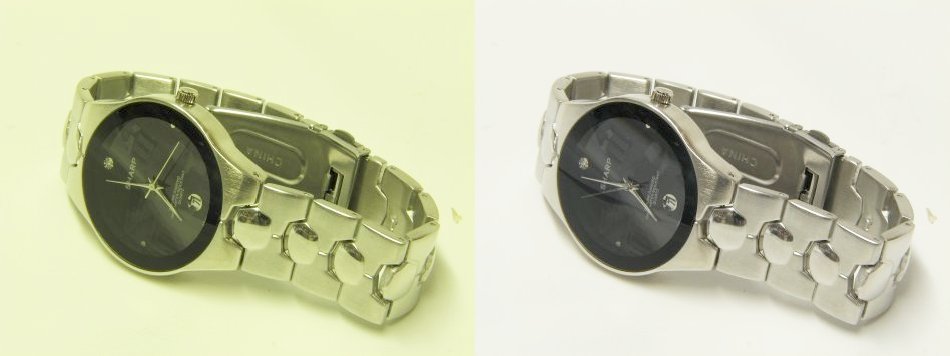
When using a light source other than the flash or daylight, you will likely find that the light source is causing the image to be too green (fluorescent lights) or too red (incandescent lights). For film cameras, you could buy special film or use filters to compensate. Digital cameras typically have a 'white balance' function that corrects for the type of lighting you're using. Generally, to set the white balance for the lighting you have, you aim the camera at a white or gray surface and press the white balance button. From that point on, until your camera's settings are reset, the camera will compensate for the lighting you have. The following photo was taken under fluorescent lighting. The left image was taken with the white balance set to daylight/flash. The image on the right was taken under the same lighting but the white balance was set to compensate for the fluorescent lighting.

Watch Photograph Showing Color Cast Improper light Source or Improper White Balance

Click to Return to the Main Menu

Influence of Ambient Lighting:
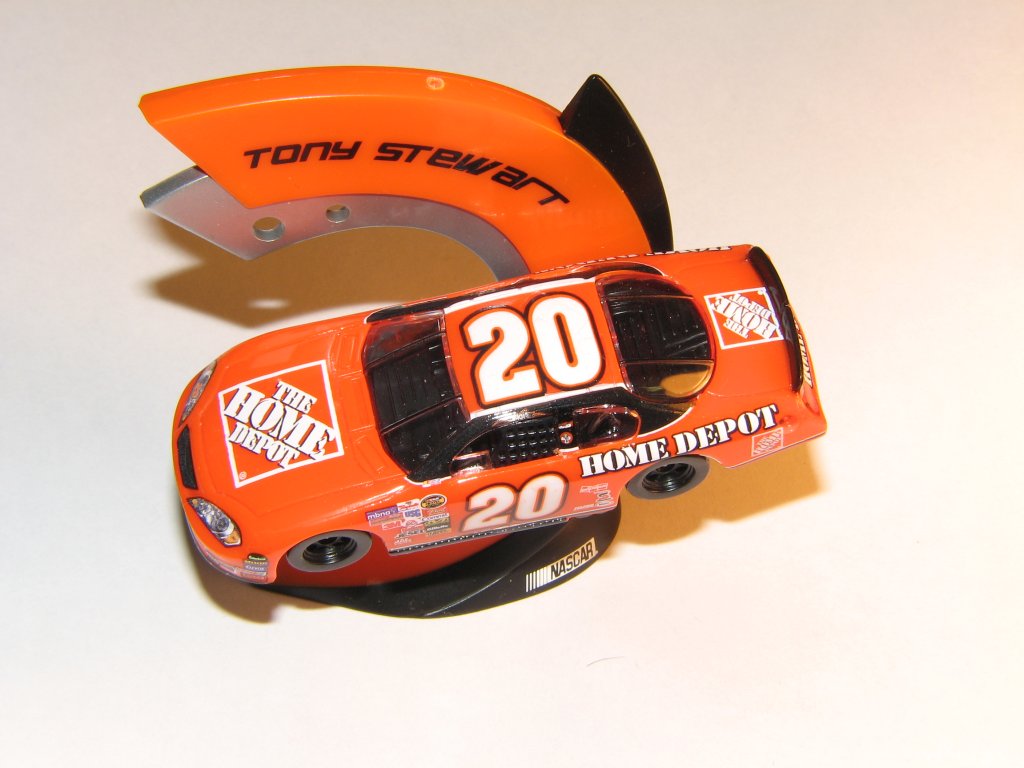
Since ambient lighting and shutter times were mentioned, now may be a good time to discuss the influence of ambient lighting when using a flash. In general, the flash will swamp-out any ambient light sources but there are exceptions. If you have bright room lighting and are not using a diffuser, the influence of ambient light may become apparent in the shadow areas. This can be avoided/lessened in several ways. A diffuser is an obvious solution. If your camera allows for manual control, set the shutter speed as high as the camera will allow. On the S3, it's 1/500 of a second. With the higher shutter speed, the shadows will be darker but at least they won't be orange or green (depending on the ambient light source) .You can also use a reflective enclosure to bounce more light into the areas which would otherwise have shadows. In the following image, you can see that the left of the photo has a green tint (from fluorescent lighting) and the right of the photo has a red tint (from incandescent lighting). Here I had the camera set to 1/40 of a second with no diffuser. That's a slower than normal shutter speed but it helps to show you that ambient lighting can have undesired effects on a photograph. If your camera doesn't allow for manual adjustment, set it to a sports mode. That should set the shutter speed higher. If your camera also sets the ISO rating higher in sports mode, you may end up with noisy/grainy photos. Try to find a setting that will allow high shutter speed and low ISO settings.

Photograph of Model Car Showing Problems Associated With Ambient Lighting

Click to Return to the Main Menu

White Balance Failure:
Auto white balance often fails if there is no white in the photo. In the following photo, you can see a 'yellow' plastic cap (supplied with the LensMate adapters to serve as a dust cap). The image on the left was taken using a white piece of paper to set the white balance. The center and right images were taken using the auto white balance. In the center image, there are no white or gray areas for the camera to use as a reference. In the right image, there is a white background and the silver clip holding the cap. The camera could use either as a reference to get the balance correct (as it did on the right).

Camera White Balance Failure

Click to Return to the Main Menu

Proper Exposure:
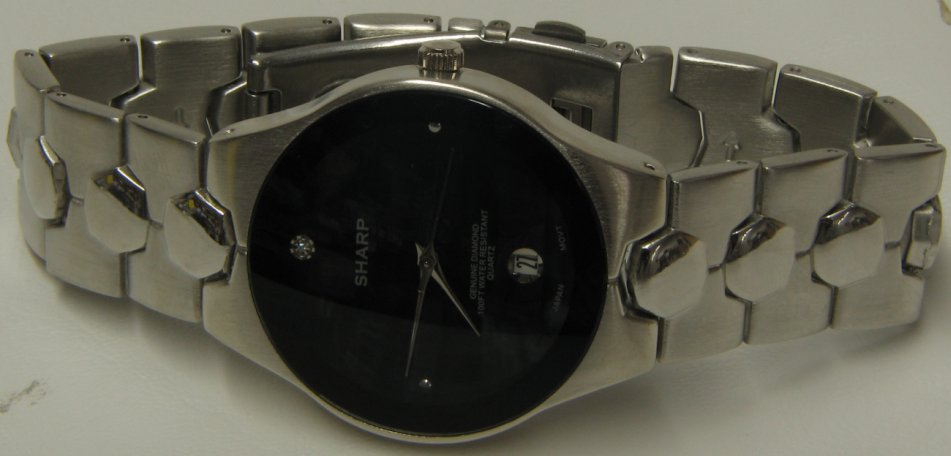
When photographing an object, you need to get proper exposure. In general, this means that all of the object is exposed well enough to see the details of the entire object. For some objects, this is easier than others. The images below were photographed with the camera set to manual. They were exposed for 0.2, 0.4, 0.8 and 1.6 seconds each under normal room lighting. The first photo is obviously under-exposed. The details of the face of the watch are completely lost. Even using software, there is virtually no way to enhance the photo to anything remotely acceptable.

Watch Photograph That's Under-Exposed

The next photo may be considered to be under-exposed by some but it's salvageable if you want to lighten it slightly. Looking at the watchband, you can see the texture of the surface of the band virtually throughout the image. The face, while a bit dark, has pretty good detail. In this photo, you could selectively lighten the face and have a usable photo. When the fine details are important, like the texture of the metal surface, you have to capture them in the image. Brightness, contrast and sharpness can all be modified but if you don't capture the important fine details of the object, there's little that you can do to recover them.
Watch Photograph That's Moderately Under-Exposed

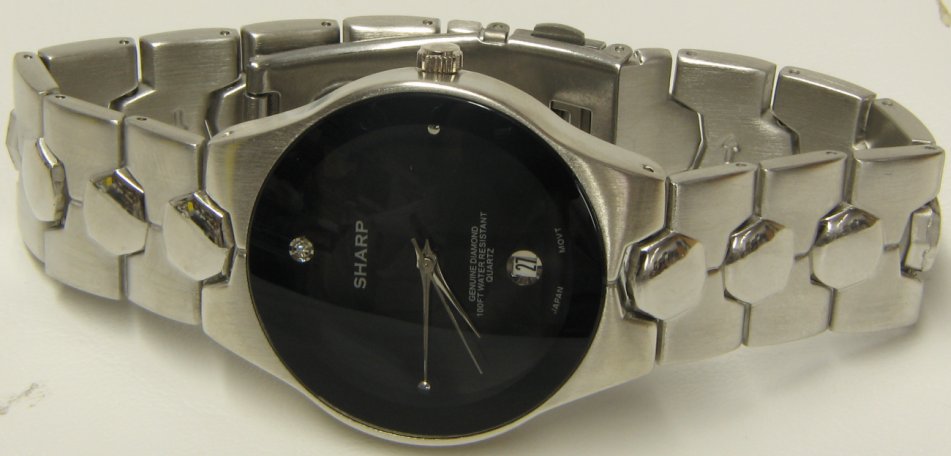
The face of the watch below is better than those above but the band is somewhat blown out (some fine detail lost). You can see the texture in very few areas. If you had an object like this to photograph and you couldn't get a single perfect photo, you could use a program like Photoshop to combine the best parts of each.
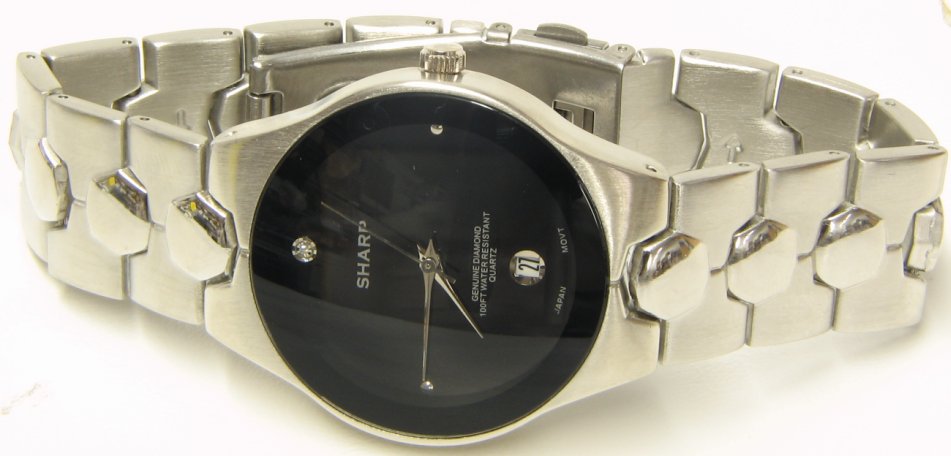
Watch Photograph That's Relatively Well Exposed

While some may think this is the best image because it's the brightest, it's actually very bad. There are too many blown out areas to consider this to be a good quality image.
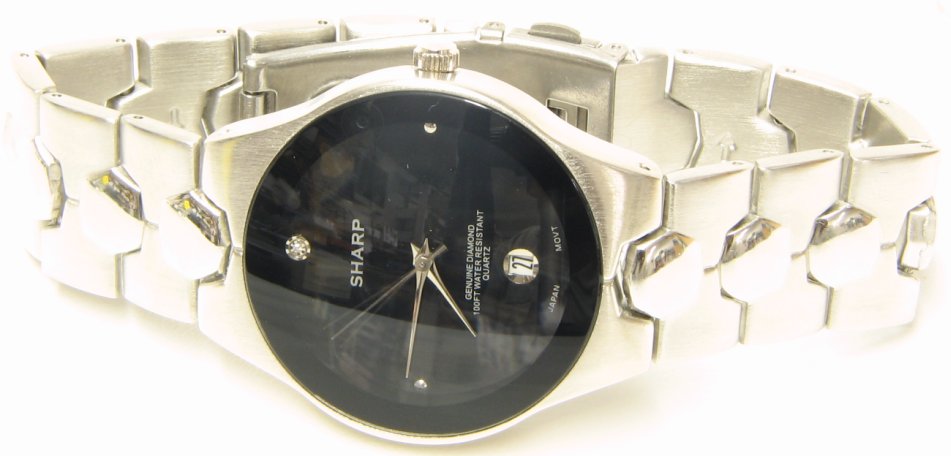
Watch Photograph That's Over-Exposed

The following image has been "shop'd" (edited in Photoshop). I cut and pasted the face of #3 onto the band of #2. This resulting image could be considered to be a relatively decent photograph. Of course, if this would have been professionally done, there would be no reflections in the watch crystal as I have here. This is what the photo can look like when a little more time is spend trying to get it perfect.
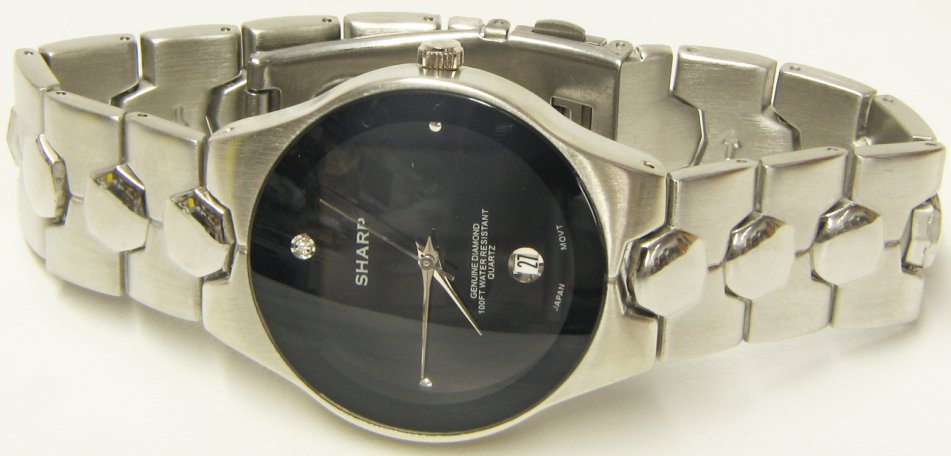
Composite Watch Photograph

Click to Return to the Main Menu

Compressed Gas Dusters:
Compressed 'air' dusters can be good for cleaning some devices but I'd warn against using them to clean your camera. If you use these to blow out the connectors and such on your camera, you may force dust inside the camera body. There's no guarantee that the electrical connectors provide an air-tight seal. If you blow dust into the camera body, it could end up on the sensor or on the inside of the lens. If you apply too much pressure to sensitive diaphragms (used for microphones or speakers), they could be fractured. Either type of damage will require that you send the camera to a service center for repair. It's unlikely to be covered by any warranty. If you want to use it to clean the close-up lenses before attaching them to your camera, that would be safe.

When the can is full or near full, you must keep the can vertical. If you tilt it, you may dispense liquid which can damage the surface of the lenses or even injure bystanders. The chemical used in most dusters can be used as a refrigerant and is VERY cold as it boils off at atmospheric pressure. If you're unsure how far you have to tilt it to dispense liquid, aim the can in a safe direction and begin spraying while increasing the angle of the can.

You should know that some of these products have additives that deter their use as inhalants. It appears that some of these additives are flammable. This is only a danger when liquid is dispensed.

Click to Return to the Main Menu

Further Softening the Flash:
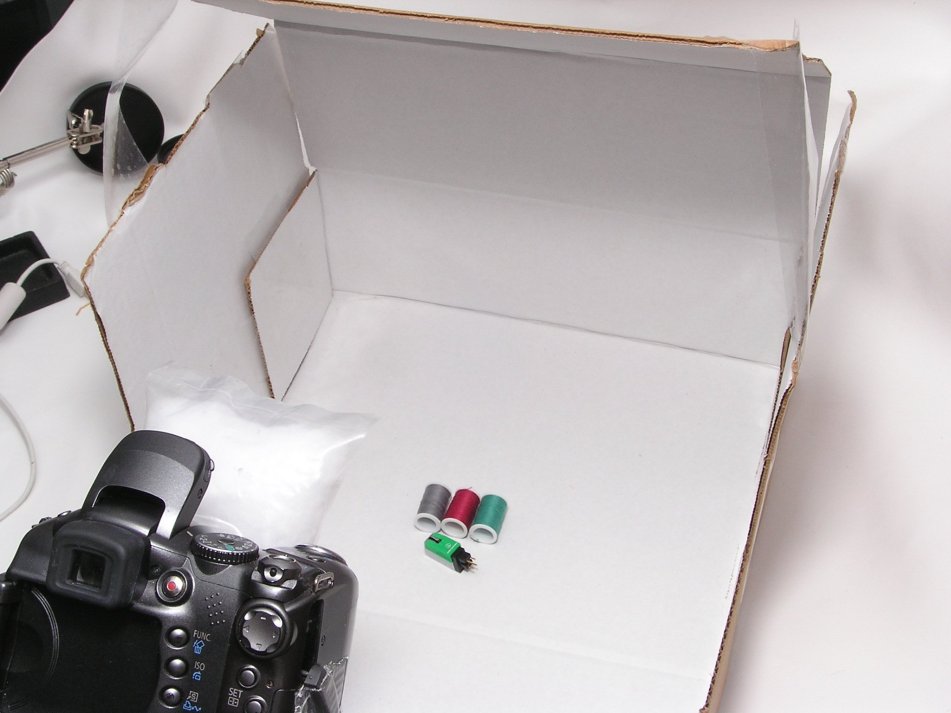
I don't know if you've noticed but many product images taken by professionals have no shadow around the objects being photographed. This can be accomplished in several ways. The simplest is to construct a reflective enclosure. Below, you can see that I've taken an ordinary shipping box and folded it inside-out. It's not folded precisely as designed because it worked better the way I have it here (it would have been much smaller if folded correctly).

Shipping Box Used As A Reflective Enclosure

As you can see, there is virtually no shadow around the objects. What little shadow you see is very soft.
Shipping Box Used As A Reflective Enclosure - Virtually No Shadow

Comparing the image above to the one we showed you previously, you can see that the shadows are much less significant. The diffuser alone does a good job but having the objects inside a reflective enclosure makes the photo even better (if you define better as having fewer/softer shadows).

Above I mentioned that there was at least one more way to reduce the shadows. Many professionals use a slave flash mounted under the table on which they place their objects. The table is translucent so the flash fires through it. Since the objects are lit from the bottom, there is virtually no chance that they'll have a shadow.

Click to Return to the Main Menu

Close-Up Lens Comparison:
This page shows the difference in the images from 4 different close up lenses. When you go to the individual pages, the images will be large but only a fraction of their true size. Follow the instructions near the bottom of the page to see them full size. When displayed actual size, you'll have to scroll to the center of the image.

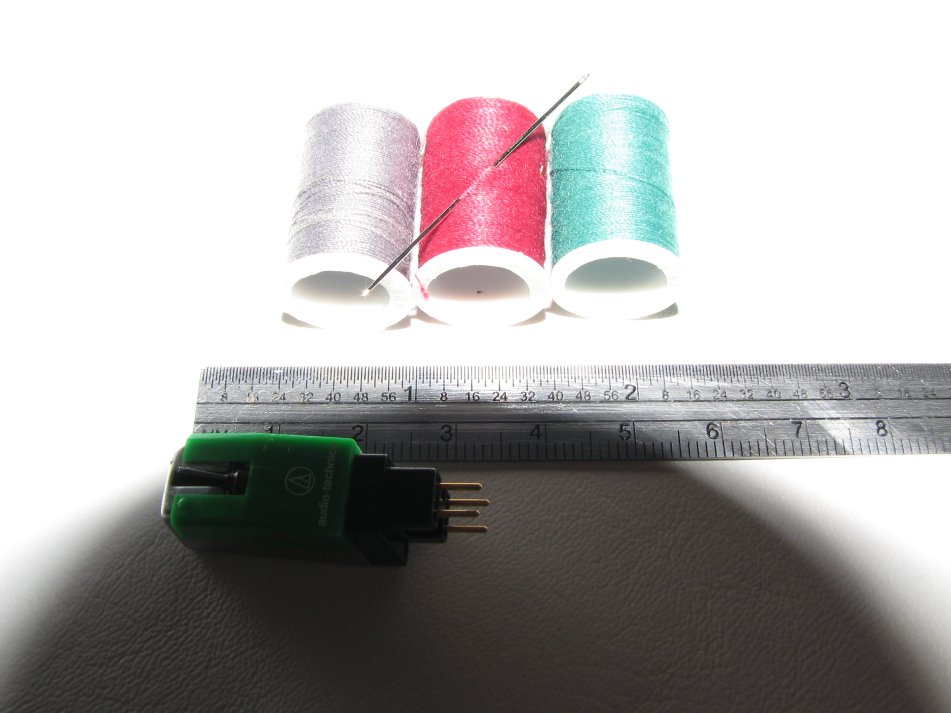
For those who don't recognize this bit of ancient technology, the device is a magnetic phono cartridge. For a size reference, the end of the tube in which the stylus is mounted is less than 0.024" wide (~0.6mm). I used it because I knew that it had a small, precisely made stylus.

Click to Return to the Main Menu

Diffuser Comparison Shots:
This page shows you several images taken with a +4 diopter lens and either a can-type diffuser or a bowl-type diffuser. I offer my opinion on the various images but you can decide for yourself which you think are the best.

Click to Return to the Main Menu

Other Styrofoam Diffusers:
This page shows different ways to use the bowl diffuser and a styrofoam cup as a diffuser. These and others can be found on various sites on the internet. As always, you should experiment to see what works best for your equipment and subject.

Click to Return to the Main Menu

Shooting Flowers:
OK, I'll admit that I don't really like taking photos of flowers. It's too much like art. I'm much more interested in the technical side of photography. To show you a few different results with flowers, I put together this page.

Click to Return to the Main Menu

Photographing Clear Bottles:
If you have to photograph a clear/transparent/translucent bottle, this page may be helpful.

Click to Return to the Main Menu

Photographing Wine Bottles:
If you have to photograph a wine/spirits bottle, this page may be helpful.

Click to Return to the Main Menu

Photographing Coins:
This is a basic introduction to photographing coins. There are many ways to get good images. Here I'll show you a few examples with various lighting and backgrounds.

Click to Return to the Main Menu

Basic Jewelry Photography:
Most of the tutorials on the internet show jewelry photography skewed towards the use of a particular product. On this page, I'll show you how to get reasonably good photos for minimal cost. The first images look really bad due to poor lighting choices. As the page progresses, the quality of the photos gets better.

Click to Return to the Main Menu

Miniature Clamshell Stage:
This page shows you a few images taken in a clamshell stage comprised of 2 styrofoam soup bowls. This is the same stage/setup used for the jewelry page.

Click to Return to the Main Menu

Dark Images:
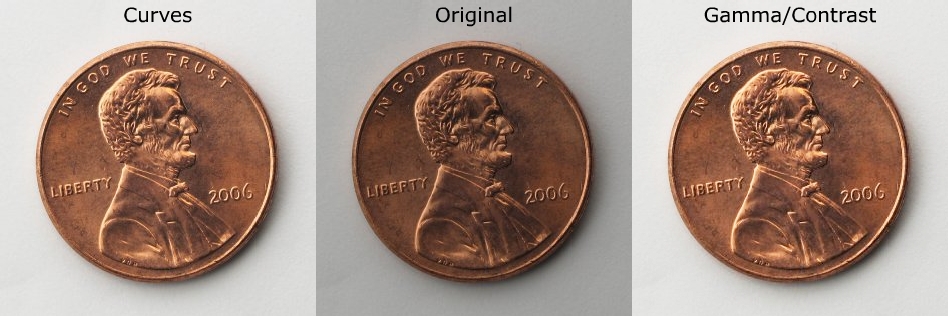
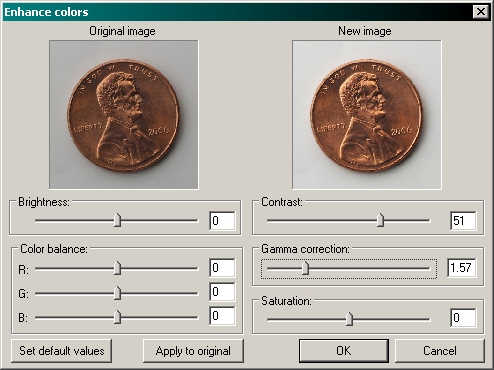
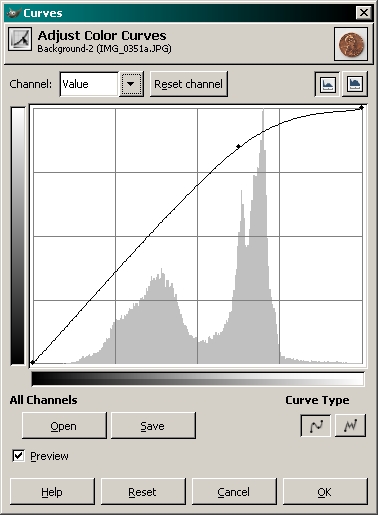
I often take photos that may seem a bit under-exposed. This is done to preserve detail in the brightest areas. If you have areas that are blown out, that information (what the surface looked like) is forever lost and unrecoverable. If you get the exposure just right (which may initially seem a bit dark), you can edit the image and make it brighter. Many times, the best way to change the brightness of a well exposed image is through the 'curves' function of the editing software. If it has no curves function, use the gamma and contrast to get the image to your liking. Here, the gamma and curves images are a bit different but that's because I didn't take the time to match them perfectly. They are both acceptable to me.

IrfanView Dialog Box

This dialog box is from IrfanView. A program I use a lot to crop, resize and make minor changes in images. This program allows you to adjust the gamma and contrast. It shows you the difference and, when you are happy with the results, you can apply the changes to the original.

The GIMP Dialog Box

This dialog box is from the GIMP (a free image editor similar to Photoshop). To adjust the curves, you grab a point on the diagonal line and move it. Grabbing the center of the line and moving it slightly to the upper left corner of the box is often all that's needed to make significant improvements. Here I needed to move it a little higher on the line. When you adjust the curves, you have two sets of levels displayed. The vertical grayscale bar is the output value. The bottom grayscale bar has two sections. The bottom half is the full spectrum. The top half shows the new values. Here, you can see what was a medium brightness is now brighter. The top and bottom of the scale are not changed (as you would have if you used a 'brightness' adjustment).

This is the beginning of a tutorial for the GIMP software. If you follow this link, you will learn other ways to

Click to Return to the Main Menu

Inexpensive Light Table Using Flash Units:
I mentioned that some photographers partially light the objects from the bottom. This page shows a cheap light table with a relatively inexpensive flash. This one uses an even less expensive setup.

Click to Return to the Main Menu

Inexpensive Light Table Using CFLs:
The previous light tables use flash units for lighting. This one uses constant lighting supplied by Daylight Balanced Compact Fluorescent Lamps.

Click to Return to the Main Menu

Shooting on a Glass Stage:
Sometimes, you want a background that's a little different. You can use a piece of plate glass and a few pieces of colored material to produce some reasonably nice looking backgrounds. Here are a few photos with different color backgrounds.

Click to Return to the Main Menu

Building a Mini-Studio:
If you want to photograph objects slightly larger than those we've previously discussed, this page may help.

Click to Return to the Main Menu

Photographing Electronic Equipment:
This page may help you if you're trying to photograph a piece of electronic equipment with a display.


Click to Return to the Main Menu

Random Notes

Image Stabilization:
Many cameras are equipped with image stabilization. In most all cases, the image stabilization is only to reduce camera shake. At this point in time, I don't know of any IS systems that compensate for the movement of the subject.

Focus Area:
When an auto-focus camera focuses for the photograph, it can use multi-point focus or spot focus. For the photos I generally take, I use spot focusing. Multi-point focusing is generally for scenes where there is no central point of focus (landscape vs portrait).

Manual Auto Focus:
Many times, you'll try to focus on one particular point of an object but the auto focus continuously focuses on a different part of the subject. For those instances, you can allow the camera to focus and then move the camera forwards or backwards until the point of interest is in sharp focus. It may take a few wasted shots to get it right but it does work.

Macro Focus Rack/Rail:
When working at very high magnification, depth of field is very thin and therefore, focus must precise to obtain the photo you desire. For specialized macro work, you can use a focus rack. It mounts on a tripod (the camera mounts on the rack) and allows very precise movement towards and away from the subject. Some even allow for lateral adjustment.

Heat Produced by Flash:
It's important that you never allow anything to be in contact with the lens of the flash when it fires. From my experience, it's possible to permanently scar the lens as the contaminant burns (when the flash fires).

Rechargeable Batteries:
I haven't yet added any information about rechargeable batteries to this site but the Basic Flashlight Tutorial page (you'll have to see the page to understand why it exists) on one of my other sites has information regarding batteries and chargers. The information there may help you avoid costly mistakes.

Chromatic Aberration:
Chromatic Aberration is seen as colored fringing in an image. It typically occurs near the corners of the image and is most obvious where light objects meet dark objects. If you visited the section of the site where I displayed the sample images from various lenses, you should remember that one lens had particularly poor focus. The same lens is also plagued with CA. This is the thumbnail from the photo. Even in this small image you can see the problem clearly. This is what it should look like.


Click to Return to the Main Menu

NEW!

Photographing Live Insects:
This page may help you if you're trying to photograph insects in a controlled environment. This is a work in progress so if you care to provide feedback, please email me.


Click to Return to the Main Menu

Sample Images


Amphibians and Reptiles
Aphids
Milkweed Assassin Bugs
Fire Ants
Flies
   Mosquitos
   Aedes Vexans - Female
   Aedes Vexans - Female - Gravid
   Aedes Vexans - Male
   Ochlerotatus Infirmatus - Female
   Culex Quinquefasciatus - Male
   Culex Quinquefasciatus - Female
   Psorophora Howardii - Female
   Psorophora Ciliata - Female
Harvestmen (daddy long legs)
Green and Brown Lacewings (adults and larvae)
Leaf-Footed Bugs
Millipedes
Mites
Moths
Spiders
   •Garden Spiders
   •Jumping Spiders
   •Golden Silk Orb Weaver (Banana Spider)
   •Ghost Spiders 1
   •Ghost Spiders 2
   •Lynx Spiders
   •Sheet-web Weavers
   •Hacklemesh Weavers
   •Wolf Spiders
Springtails
Stink Bugs
NEW - Yellow Jackets
Old Web Site #1
Old Web Site #2

Click to Return to the Main Menu

Notes:
  • I am not a professional entomologist/arachnologist. If there are mistakes in the identification of any individual or in the information provided, I would greatly appreciate it if you would email me to let me know what is incorrect.
  • I'm not a professional photographer. If you have suggestions that will help me to improve this site, please email me.
  • You are free to use the images on this site for non-profit, educational purposes. If you want to use them for commercial projects, please contact me.
  • Virtually all identification of the individuals on this site were obtained from the BugGuide.net site. It's a great site that's maintained and staffed by volunteers. They do a great job.


Click to Return to the Main Menu
If you're interested in electronics or car audio, you may be interested in my car audio site. It has lots of graphics and covers virtually everything associated with car audio.

If you are having trouble using a personal computer, the Basic Computer Operation site may be of interest.


Click to Return to the Main Menu


eXTReMe Tracker